Burmese tofu, also known as Shan Tofu or Chickpea Tofu, is made from chickpea flour, water, salt and turmeric. This chickpea tofu recipe is made with a little extra flavour and tips to make your first batch a delicious success!
How Burmese Tofu is Different
Made in a similar way to polenta using chickpea flour, chickpea tofu is firm enough to cut into blocks for pan-frying but it has a more delicate, creamy texture than regular soy tofu. It contains the whole chickpea so it’s high in carbohydrates and fiber.
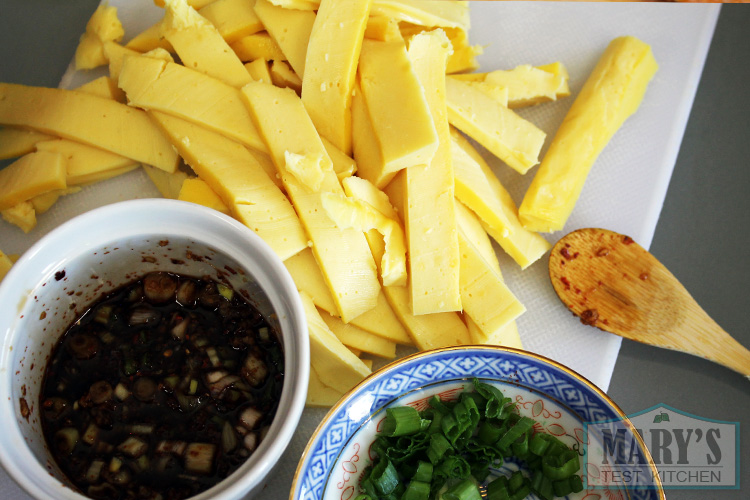
In contrast, during my “Will It Tofu” series, I made High Protein Chickpea Tofu by applying the traditional soy-tofu making method to whole chickpeas. The fiber and starch is removed so the resulting tofu is high in protein but low in carbs.
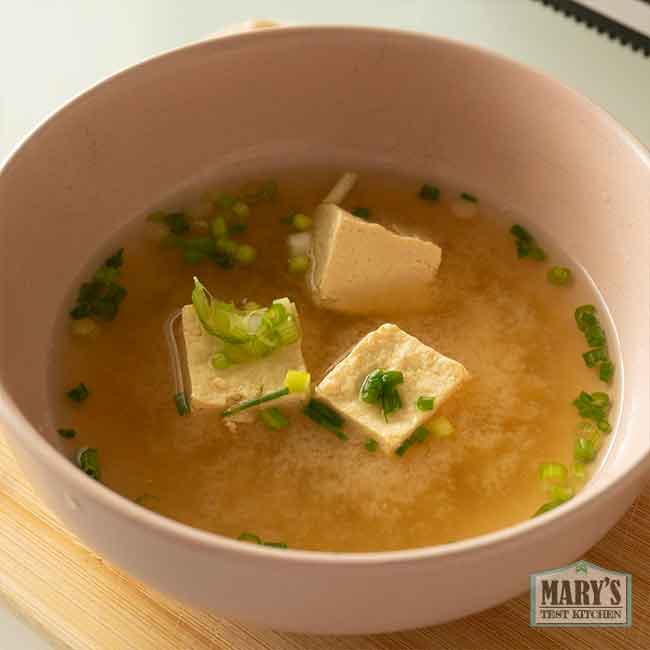
As in the photo above, high protein chickpea tofu holds up in soups. But Burmese Tofu would dissolve (making it a nice way to make creamy sauce as well!)
RELATED RECIPES
Video Tutorial for Burmese Tofu aka Chickpea Tofu
Why you’ll LOVE Burmese Tofu
Burmese Tofu is simply delicious when prepared properly. At the simplest, it can be just chickpea flour and water. But I love to add seasonings to make it even better! This chickpea-based “tofu” is
- firm enough to cut, with
- a creamy mouthfeel (a cross between custard and silken tofu),
- very affordable,
- easy to make on the stove (no coagulation or pressing necessary!),
- requires NO special equipment, plus
- it’s really filling for the amount of calories!
How to Use Burmese Tofu
This carbo-licious “tofu” is fabulous
- cut into cubes, dipped in a little flour and fried up as Crispy Dippers
- as salad toppings,
- on rice,
- in place of scrambled eggs, and
- as the egg part of a quiche

Turning into a Burmese Tofu Obsession…
Over the last few months, it’s become one of my go-to foods. I’ve made the recipe to be more savory and more suited to how I like to use it, but it’s still super easy to make. And because chickpea flour is so inexpensive and nutritious, there’s no reason not to have it for breakfast, lunch, and dinner.
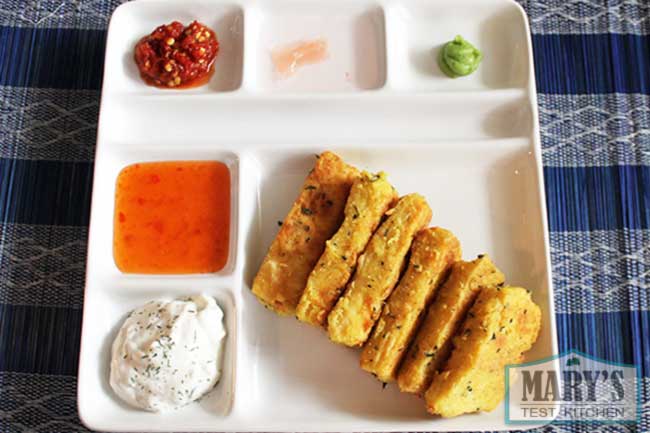
Burmese Tofu, cut into blocks, dredged in flour, seaweed flakes, and nutritional yeast, then deep-fried.
Have you tried Burmese Tofu before? What did you think?
Edit June 27, 2014: By popular request, I have posted the recipe and a video tutorial on how to make Burmese Tofu Crispy dippers like the ones above. Click here for the post.

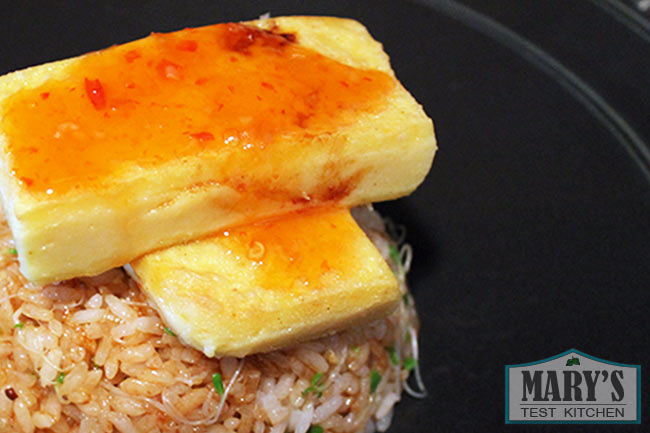
Photo above: Burmese tofu with Thai sweet chili sauce on seasoned brown rice and sprouts.
Burmese Tofu Ingredients
The main ingredient is chickpea flour. If you’re not very familiar with it, this can be a bit confusing to shop for because of it’s many names, including
- chana flour,
- besan flour,
- garbanzo bean flour,
- as well as chickpea flour.
The good news is they all work. Chana and Besan are two varieties of chickpeas but they are similar enough for our chickpea tofu purposes. Garbanzo beans are really the same thing as chickpeas but just a different name. The only type I don’t recommend is sprouted flour. I find the flavour way too strong and grassy. It always tastes raw to me no matter how long I cook it. However, that’s just my opinion so perhaps you will love the grassy flavour of sprouted chickpea flour.
The only other ingredient that you really need is a liquid. Water is fine but broth is better. You can use any broth you like as long as it’s thin like water. I love to use:
- vegetable broth,
- vegan chicken-style broth,
- the water leftover from cooking beans.
You can really get creative here and create your own flavour combinations. One commenter even uses miso and ginger! Sounds great to me!
Lastly, don’t forget salt. Yes, I just said you only need the two ingredients mentioned before but a little salt will really bump up the flavour and make your chickpea tofu more delicious. While we’re talking more delicious, feel free to add additional herbs and spices that you like.
Troubleshooting Burmese Tofu / Chickpea Tofu
Over the years since this post was first published (update on March 2, 2020), there’s two problems that commenters have bumped into again and again.
The first issue is that their chickpea mixture isn’t setting (becoming solid). To prevent this, make sure to:
- Measure the ingredients accurately. And unlike with measuring regular flour for baking, you should not fluff the flour before scooping. Instead, pack the flour into the measuring cup.
- Add the cold liquid + chickpea flour mixture only when the water is at a rolling boil. It will look like the water is rolling in on itself in a circle.
- If you have a gas stove, instead of turning off the heat, just turn it as low as it will go without going out.
Doing these things should get your a chickpea mixture that sets up right away. I find that my chickpea tofu will set up so fast it’s hard to get it smooth on top before it solidifies.
The second issue is their chickpea tofu leeches water during storage. There’s nothing to be done for this except draining off the liquid every day. Alternatively, you could store your chickpea tofu in a container that has a little rack in it so moisture can drip down.
The last common problem is that their tofu is too soft for their liking. In this case, add a little more chickpea flour to your chickpea flour + cold water mixture. Try going up to 3 cups of chickpea flour to 6 cups of water. The only issue I run into is that the mixture can become hard to stir and cook all the way through before setting if I add too much. That said, I have very weak wrists these days so you might not have this problem!
Finally, one thing I should mention is that chickpea flour can go “off.” Typically, I buy the same brand of chickpea flour every time but one bag resulted in very bitter tofu! I even tried to cover up the bitterness by making a quiche with tons of seasonings. Didn’t work. So I threw it out and got a new bag. Problem solved! If this happens to you, it just might be a bad batch of flour.
Printable recipe for Burmese Tofu (AKA Chickpea Tofu)
Burmese Tofu with Chickpea Flour
Burmese tofu is a soy-free, gluten-free food made from chickpea flour, water, salt and turmeric. This variation uses vegetable stock to infuse a deliciously savory flavour.
Ingredients
- 2 cups chickpea flour (PACKED*)
- 6 cups of water, divided
- 1/4 teaspoon turmeric (optional for color and flavor)
- 2 cubes vegetable bouillon (or sub out 4 cups of water for veggie broth) or a teaspoon of salt
Instructions
- Line a rectangle pan or casserole dish with parchment paper. Then, in a large pot, boil 4 cups of water or vegetable stock. Add the bouillon cubes if using.
- Meanwhile, combine the chickpea flour, turmeric (if using), and 2 cups of cold water. Whisk until smooth.
- When the 4 cups of water/stock comes to a ROLLING boil, carefully stir in the chickpea mixture. IMPORTANT: the water MUST be at a rolling boil before this step!
- If you are using an electric stove, turn off the heat and continue stirring vigorously for five minutes. If you are using a gas stove, turn the heat to the lowest setting possible. The mixture will turn from matte to glossy and will become super thick. If it does not, increase the heat just a little to continue cooking and stirring until it does.
- Pour the mixture quickly into your prepared pan and spread out evenly with a spoon. It will start to set up right away.
- Let cool to room temperature before chilling in the fridge for an hour. After chilling, cut up the tofu as desired for easy storage.
- Eat cold, heated up or however you like! Try them coated and fried like in these Burmese Tofu Crispy Dippers! Enjoy!
Notes
*For firmer tofu, you can increase the amount of chickpea flour. However, I find it becomes more difficult to cook the mixture thoroughly enough when I add too much flour so I increase it 1 cup more at the most.
Store your tofu in the fridge. It will leech water as it sits and gets firmer over time. Simply drain out the water periodically.
One of my Instagram friends told me it does fine in the freezer, just thaw it in the fridge before using. I've never tried as I always eat it up quickly!

-
[…] allergic/intolerant of course (because in that case, I am sorry…maybe check out this gluten-free, soy-free Burmese Tofu or Black Bean falafel instead..). Click here for the printable […]
Leave a Comment


Genius!!!
Thanks, Stephanie! I just came across the idea when trying to use up my chickpea flour. 😀
I bookmarked a Burmese ‘tofu’ recipe a long time ago, but haven’t tested it out! Love that it’s soy-free, miam! Looks super good!
Yes, it is incredibly simple. It’s become a staple food for me. I almost always have some in the fridge ready to be made into other dishes.
Another grest recipe. I have chickpea flour waiting. I recently made a baked verison with olive oil and black pepper.
Thank so much, John! And I’ll have to try your baked version.
I should be using burmese tofu more. it just is so simple and versatile!
Yes! Thanks for the comment. I just <3 the stuff!
I tried this recipe and it came out really watery, I followed the directions but mine didn’t quite thicken like yours I stirred for 10 minutes before just pouring it into the pan and giving up as it wasn’t getting as thick as yours. I put in in the fridge for 2 night to leech the most amount of liquid but as I kept it in the fridge it didn’t get firmer it just leeched more water and started falling apart. i tried to put some in a pan and brown in but it just melted and fell apart. I’m going to reattempt this recipe this week, any idea what I can do different? I used the bob’s red mill garbanzo bean flour, I dunno if that had anything to do with it?
Hi Ashley,
Sorry to hear that it didn’t work out for you. Two things come to mind to double check:
1) Did we use the right amount of water? 2 cups cold + 4 cups boiling water
2) Did you pour the chickpea/garbanzo flour mixture into the boiling water at a ROLLING boil? It really has to be at the “rolling” stage when pouring it in.
Another thing I’ll point out from the recipe is:
At step 5: If you are using a gas stove OR it does not seem to get thick within a couple minutes, turn up the heat to medium-low (instead of turning the heat right off).
Lastly, make sure to drain off the excess water daily so that the tofu doesn’t sit in water too long.
I hope this helps! Cheers!
If that happens it is still edible. You can stir fry it like scrambled eggs
I stumbled on your page from reddit and I’m really impressed! It’s crazy to me that $1 worth of chickpea flour yields so much delicious tofu. Thanks for the recipe!
I fried some strips up with franks red hot and made buffalo Burmese tofu wraps with a cucumber dill sauce. Pure lunchtime bliss.
Rusty, you have just made my day! I was having a bit of an overwhelming day at my “real” job and this positive comment really lifted my spirits and reminded me why I do what I do. I’m so glad you’re enjoying the Burmese Tofu. Your idea of making buffalo Burmese tofu wraps is pure genius! I’ve got to try that ASAP!
Hi Mary. Love you. I wanted to share that this tofu is made, cut into diamonds, then deep fried until dry, then simmered in a gravy with potatoes. It is called “Dhokar dalna” and it is a Bengali dish, eaten with rice ☺️
Can I still make this if I have only one cup of chickpea flour? This what I have until I purchase more, will it work.
Yes! Just use half of much of all the ingredients. I have done it many times and it works fine. Cheers!
Hi Mary!
I’ve been looking for a soy alternative for awhile now… thank you so much for posting this recipe… I will try it today. Can I use foil instead of parchment paper?
Thanks,
Melissa
You’re welcome, Melissa. Parchment paper keeps the tofu from sticking to the pan, making clean-up easier. If you don’t have it, you can simply oil the pan. I also think wax paper would do the trick as well. I don’t think aluminum foil would be a good idea though. Have fun experimenting!
I love this!! Thank you Mary. Just made some and can’t wait till tomorrow morning to make a scrambled eggless sandwich. So excited about this stuff. Love your channel too, never stop 🙂 x
That’s wonderful to hear, dear Hannah! I am so glad that you are enjoying the channel. Please feel free to let me know if you have any suggestions or requests 🙂 Thank you for your lovely comment.
i just read the comment where you were troubleshooting for a batch that was too runny and I’m going to try keeping the heat on but just turned down and also draining off the excess water asap but i am sad that every time i try to fry mine to make crispy dippers they are just super mushy on the inside. any other ides on what to do with this stuff?
Hi Rose,
I am assuming right now that you are working with a fresh batch of Burmese Tofu. For crispy dippers, I usually let the tofu set in the fridge for at a few days to firm up. As they sit in the fridge, more and more water will leech out, creating a firmer tofu. That said, Burmese tofu does have a much softer texture than regular soy tofu so it inside will be soft, much like polenta fries. I hope that clears things up. Best of luck!
I just ran across this recipe. I can’t do soy, so this sounds interesting. A couple thoughts with which to experiment:
RE “eggless salad”, I recently ran across info on black salt (kala namak) that contains some sulfur, so is used to add an egg-like flavor to things like that.
RE texture, I know that “regular” soy-based tofu changes texture — becomes firmer, chewier, and more “meat-like” — when frozen. It might be interesting to experiment and see if this does so, also.
RE water, I’ve seen recipes that use “regular” soy tofu that call for adding gentle pressure (plate on top or something) to remove “excess” water prior to using the tofu in a given recipe.
Black salt is fantastic! I use it for tofu scrambles all the time. I’m not sure about changes in texture when freezing Burmese Tofu. Its original texture is very different from the type of tofu used for “million layer tofu” or frozen tofu. But..let me know if you experiment please! Cheers!
I dont think it freezes well. When thawed, it becomes this dry weird sponge, its horrible.
Some say that’s what regular tofu is like when it’s frozen and thawed and they do it on purpose!
Can this tofu be used where other recipes call for the reg soy tofu?
If so you just made me the happiest man 🙂
Yes and no. It’s softer and it doesn’t hold it’s shape as well as regular soy tofu so you have to treat it a bit more carefully. And it doesn’t take to marinades like soy tofu does.
I know that you already have a soy tofu recipe, but is it possible to make soy tofu using this method as well? For instance, using soy flour(or just soybeans made into a paste) and then following through the same way?
It may be possible but I haven’t tried it.
Hello Mary, what’s the recipe of the batter/coating that you used when you fried the tofu? The tofu pieces look like they’re covered in something.
Thanks for sharing BTW 🙂
Hi Charmaine,
Here’s the recipe for Burmese Tofu Crispy Dippers: https://www.marystestkitchen.com/burmese-tofu-crispy-dippers/
🙂
Have fun!
Oh it’s the link you included in your post (face palm). How nice of you to re-post the link! Thanks again 🙂 This raw vegan’s gonna make them for her family, and cheat a little herself 😉
I just tried making this recipe & it ended up being too watery. Is it possible to take the stuff that failed, heat it up, add it into some more boiling water and see if it will harden up a bit more?
If your batch turned out too watery you don’t want to add more water. Instead, let it rest in the fridge and water will leech out. Drain the water that pools and the tofu will become firmer over time.
O boy… it looks so good but I did things wrong. Possibly I am to impatience. Made it yesterday and wanted to eat it today with this recipe https://www.youtube.com/watch?v=sak__45qp6o but unfortunately it became very soft in the pot when I wanted to stir fry the blocks.
How long do you have to refrigerate it before you can use it? And, how long can you keep it in the fridge before it is no longer eatable?
Thanks!
will try again… my first seitan sucked and now I am a seitan chef 🙂
Burmese Tofu is much softer than the soy-based firm tofu used in that video. It also cannot stand up to a lot of liquidy sauce. Next time, recommend cutting your Burmese Tofu into cubes, bake at 400F until the cubes are a bit browned on the edges, then add it to your stir-fry after you’re done cooking everything else. Fold in gently so the tofu gets covered in sauce but not broken up.
You can use the Burmese Tofu as soon as it solidifies. It gets firmer as it sits in the fridge as long as you drain any water that leeches out.
Keep it in the fridge for up to a week. I would say no longer than 5 days.
Keep up the great can-do attitude! 🙂
I made the Burmese tofu, as my husbands requested, as he remembered eating it in Burma where he grew up. The first time I made a full batch, and it turned out very runny, not thick at all. It was still very soupy in the fridge after two days. Then I read the comment you made for someone else who had the same problem as me. This morning I made half a batch, measured very carefully the water and flour, water rolling boil, very slowly added the flour water mix and stirred 5 minutes with my gas range on low. Still very runny. Do you think it has something to do with my garbanzo flour? Or should I put extra flour in the recipe or else cut back on the water? My husband was disappointed.
Adding more flour/ using less water would probably do the trick for you.
One drawback of volume measurements is that it’s not very precise. In this case, when measuring the flour you want to do the opposite of how flour is usually measured for things like baking. That is, pack down the flour into your measuring cup. Do not do the spoon-by-spoon method or fluff the flour before scooping.
I tried cubing it and adding it to a veggie stir fry but they fell apart, however the flavor was amazing and the stir fry was definitely more filling than just a plain veg one, so I’m very happy! I probably should have read the comments and let it sit a couple days. For anyone who doesn’t have parchment or wax paper I used a silicone pan to let it set and it worked well, I just turned it upside down on the cutting board after chilling for an hour in the fridge and it popped right out. I still have some left over so I’m going to try the crispy dippers, they look amazing. I’ve been searching for the creamy dill recipe. Can you point me in the right direction? Great post and recipe 🙂 I love how affordable it is. I’m not even vegan I just like to have meatless meals because I’m frugal and organic grass-fed meats are expensive 😛 so, for the record: this recipe is non-vegan approved!
Thanks for sharing your experience! Here’s the link to that dilly dip recipe: https://www.marystestkitchen.com/vegan-dilly-dip/
Cheers!
Love this! I saved the recipe last week and decided to try it tonight. Ended up making a scramble tonight and loved the flavor. The rest is in the refrigerator to firm up more and looking forward to trying crispy nuggets in a few days. Also put a small amount in the freezer to see how it might (or might not) hold up to freezing. Thanks for the recipe!
Awesome! Thanks for sharing. Please let me know how your freezer test works out 🙂
Hello Mary! Thank you so much for a great recipe!
I am from Brazil and tried to make the tofu but it ended up very liquid and it didn’t firm…do you know if it’s possible to use the flour made from the white chickpeas?
I tried once again adding more flour but it still didn’t firm.
Thank you for you attention and for the great videos and recipes!
🙂
Andrea
Hi Mary, I tried the recipe and although it took longer than 5 minutes to firm up (more like 20 for me), I really liked it! Even in the phase before solidifying, as a sort of polenta/congee, so good…
It is also incredibly similar to something in northwest Italy called “panizza”, altough those are cooked just with salted water, yum!
Hi,
love this burmese tofu, but how do you use it in food, other than frying? My daughter refuses to eat it cold (I’m not too keen on it cold either), and when cooking it I find it tends to get mushy and starts dissolving. At the moment the only way we are able to eat it is to slice it fairly thin and fry on high heat, then it crisps up nice on the outside.
Am thinking if it was flavored with cheesy type flavors (nooch +??) it could be eaten cold as a cheese substitute. Have you tried anything like that?
My stove (not me!) likes to burn stuff, the last time I tried this it took a week to soak my burnt pot lol, but I enjoyed the tofu. This time I got the brilliant idea to modify it a bit. Made it pretty much as per your recipe with a bit more besan and the intention of going for something “cheesy” so I added in some nooch, herbs, garlic and onion powder, miso and a dash of mustard and lemon, then added it to the boiling water and let it thicken some before adding it into small oiled molds which I steamed covered in the Instant Pot for 20 minutes to finish firming and setting in the mold. After cooling and unmolding I had awesome healthy, tasty “cheese” without all the fat and calories of the nut based cheeses which are delish…until my scale reminds me I can’t afford the decadence!
I totally want to try this is the instant Pot now! Thanks for the details.
I have made this recipe over ten times now and never had any problems. It is fantastic; maybe my favorite thing to eat now. I have boiled miso and ginger instead of using vegetable stock and that has given a great flavor. Thank you so much for posting this; it is a great recipe!
Yay! I love to hear that, Thomas. I love the miso and ginger idea too. Thanks so much for sharing!
Cheers,
Mary
OMG! You can make “cheese sticks” out of this. I made this tofu with water, salt, yeast, white pepper and a little bit of vinegar and let it cool overnight. The next day I cut it into stick, rolled them in flour, egg replacer and bread crumbs and fried them. They cam out delicious. Really taste like cheese sticks. So yummi. Thank you for this reciepe. The best tofu ever! And you can do so many different things with it.
Thank you for this recipe, it has been just amazing during the pandemic where we can’t get our usual food. All my regional stores are sold out of tofu, beans, seitan, tempeh, everything! Except for chickpea flour and vital wheat gluten, which I can use to make my own Shan tofu and seitan.
This is easier to make fresh than having to plan to drain and season normal tofu. Very fast cooking and almost-instant setting with so many customization options.
And thanks for sharing your extra tips instead of just a basic recipe. I haven’t had any problems making it but my friend couldn’t get hers to set so I sent her here. I like to pour it into a flexible silicone container, then it pops right out without needing any parchment paper, oil, etc.
I love this tofu in all recipes: any curry, salad, stir fry, soup, breakfast scramble, etc. I have told so many people about this recipe that I bet the markets will soon be out of chickpea flour 🙂 Thank you again and I hope that you are well!
Hi Amber,
I’m so happy to hear this! Not happy that everything is sold out around you, but happy that you can make thing work anyway. Way to find the silver-linings! *high five*
Thanks so much for sharing this page with your friend too. I’m really glad I could help. I <3
I really appreciate you sharing all this feedback with me. It helps a lot and you're helping to motivate me especially at this time when I’ve needed extra motivation. Hope you stay well and safe.
Cheers,
Mary
Hi Mary.
I saw your recipe on Facebook a few days ago and thought it sounded interesting. I bought some chickpea flour in town on Friday and made a batch of Burmese Tofu yesterday. I’ve estimated that it cost me around $NZ2.50 and I will get a LOT of meals for next to nothing!!!
I made a stir fried dish last night with the Burmese Tofu, vegies, chilli. ginger, garlic, onion, cashews and brown rice.
This morning I made scrambled not-eggs using Burmese tofu, nutritional yeast, a splash of soy milk, garlic and parsley. I served it on home made toasted sourdough. Yummmmmmmmmmmmm.
Thank you again for sharing your recipe
That’s wonderful to hear, Helen! Thanks so much for sharing your success 🙂
Stay well and safe,
Mary
oops … I forgot to mention that I used Kala Namak in the Burmese Tofu scramble, too
I love it!
I love this recipe. I use it in my vegan “egg” salad recipe where I use soy tofu for the “egg white” and Burmese tofu for the “yolk”.
That is so clever! Thanks for sharing!
Hi Mary,
This was a FIL for me. I had been waiting and anticipating this for weeks after purchasing the chickpeas flour. Smile anyway. I believe the water did not come to a rolling boil because the chickpea flour mixture clumped up. I stirred the mixture for over five mnutes as suggested. I stirred the mixture with a large metal spoon and a whisk. The mixture got smooth but still had medium to large clumps in the middle and the bottom ( although it was my first batch, I seasoned it and the mixture smelled so good). I turned off the heat and then I remembered that you made a suggestion of lowering the heat. Wow. The mixture looks like something from a bad prison food shot. I understand why this would make great vegan scrambled eggs (if you like that sorta thing). I do not.
Help! I want to try this again.
-Tisa Bush
Oh no Tisa!
It’s true the rolling boil is very important for the chickpea flour to get thoroughly cooked and it can set up nicely. Hopefully you’ll get it next time!
If you watch the video, you can see the progression of how the look of the mixture changes as it cooks. I hope that helps!
I’ve tried to make this twice now and it will not get firm enough to pan fry. I tried making it with 1 cup flour, 2.5 cups water, and I boiled it for a full 15 minutes, but when I went to fry it in the pan it just turned into a goopy, soupy mess. Wasn’t really that firm in the container either. Why is this not working?????
It really should be impossible to boil it for 15 minutes. As in, it would be so thick that it would splatter everywhere. I am guessing that maybe your measurements are off somewhat?