This easy homemade raisin bread is so delicious, tender and luscious, you will question whether you’re really having vegan raisin bread…or if you’re really having the biggest, fattest, most scrumptious cinnamon roll in disguise. In reality, this is a loaf shaped cinnamon roll AND IT IS GLORIOUS. There’s no need for eggs or dairy milk; this vegan raisin bread recipe uses plant-based milk and fat to keep the bread soft and moist.
Skip to the recipe.
Pin this recipe.
You can make this bread recipe manually with just your hands or use a stand mixer (or food processor with dough attachment) to make things easier on yourself. To bake the bread, you can use a loaf pan or make it into a free-form round or log-shaped bread loaf and bake on a flat baking sheet. It’s up to you; there are no rules!
Video tutorial for Vegan Raisin Bread with Icing
Thanks to everyone who submitted their vegan bread dreams and upvoted the ones they liked best on the YouTube community page! Raisin Bread with icing was one of the first submitted and, at time of writing, is the forth most upvoted. I made this one first as raisin bread is a super easy recipe that anyone can accomplish. This is especially satisfying for the beginner baker. Minimal effort, not much can go wrong, and the whole process is lovely, especially when you’re adding fragrant cinnamon and smelling that yeasty bread rise and bake up to golden brown perfection.

While all good yeast breads take time to make, a lot of that time is hands-off so you don’t have to wait around in the kitchen. You can make this delicious fresh bread today! It will take 3 hours from scratch to fresh out of the oven.
If you will be adding icing and you want it to harden, you’ll want to let the bread cool for at least 30 minutes (ideally to room temperature) before drizzling over the white icing.
How to make Vegan Raisin Bread
The basic process to make this vegan raisin bread dough is mix, knead, cover and let rise, then roll out the dough, add sugar and cinnamon, roll it back up, then cover and rise, then bake. It’s pretty easy so don’t let the number of steps intimidate you. You can do it!
Starting the vegan raisin bread dough
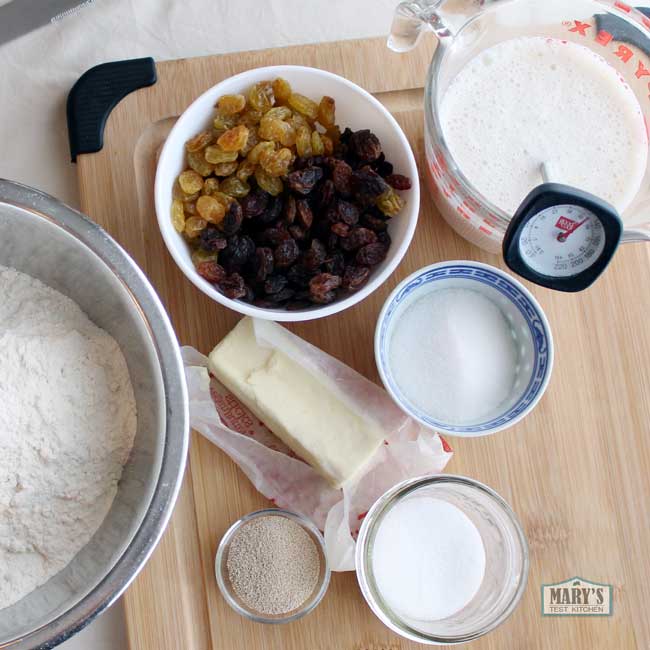
First, warm up some plant-based milk (I prefer soy milk but you can use any kind you like) to 110°F. I like to use a thermometer be precise but if you don’t have one, just think very warm bath water. You want it to be warm enough to encourage the yeast to bloom but not so hot that you accidentally kill the yeast.
While the plant-based milk is warming, combine all the other dough ingredients in a large mixing bowl (or your stand mixer’s bowl). The all-purpose flour, sugar, salt, vegan butter (or refined coconut oil), instant yeast and raisins can all go in together.
In the video, I did things a little differently. TBH I was overly excited for my new stand mixer and forgot what I was actually doing. I’m not sure why I added the ingredients one at a time. But actually, I prefer adding all the dry ingredients together at the start. I find the raisins stay in the loaf better and don’t fall off as easily. Plus, it’s less messy.
Then add the warmed milk. If you’re using traditional yeast instead of instant yeast, just dissolve the traditional yeast in the vegan milk before you pour that in.
Have issues with yeast? Check out my Troubleshooting Yeast and Bread Dough guide.
Then turn your mixer on to the lowest setting or stir with a spatula or your clean heads until the dough comes together.
Because of factors like flour variations and humidity, you may require a little more flour. If your dough is sticking a lot, you may want to work in some extra flour. Go with one extra tablespoon at a time and stop when the dough is workable by hand. It can be a little tacky but should be pretty easy to get off your hands.
If you’re using a stand mixer, you may need to stop it after a minute and scrape down the sides of your bowl. Continue mixing and stopping occasionally until your dough comes together, then continue mixing for a minute or so more.
If you’re kneading manually, knead the dough for 5 to 10 minutes. Raisin bread does not require too much kneading so I like to knead right in the bowl just repeatedly folding the dough in half and punching it down the middle.
The more you knead, the smoother the dough will be. The smoother the dough, the finer the crumb will be of the finished baked bread. This means the texture will be more even. When you knead less, the crumb will be more open, with more pockets of air within the finished loaf.
The first rise
When you’re happy with your dough, you can let it rise right in the bowl until it’s doubled in size. Choose a location that is fairly warm and free from cold drafts. On warm summer days, a spot on the kitchen counter might do just fine. But on cold days, I like to use the oven with just the oven light on to make it a little warm inside. Cover the dough as well to keep it from drying out. I like to use a turned over bowl or go for the more traditional damp kitchen towel. Make sure that kitchen cloth is clean and lint-free. I like to soak it really well in hot water and then wring it out as best I can before lightly laying it over the dough. The moisture also keeps the cloth from sticking to the dough.

It can take anywhere from 45 minutes to an hour and 15 minutes for this dough to double in size. If you’re at sea level, dough rises more slowly. At higher altitudes, you’re lucky! Dough tends to rise more quickly.
If you’re a new baker, go ahead and check on it after 30 minutes…I know you want to. You will get a feel for how much longer you’ll need to wait just by seeing the progress so far. Also, check the cloth to see it’s still damp. If you think it’s drying out, go ahead and dampen it again. If your cloth has already stuck to the dough, you can carefully drip some water on the topside of the cloth. When the water soaks through to the underside, you should be able to pull up the cloth without pulling the dough with it.
The cinnamon filling
When your dough has doubled in size, you can take it out of the bowl with lightly floured fingers on to a lightly floured work surface like your clean counter top or onto a large cutting board. Dust your hands with flour as well to prevent the dough from sticking to them as you work.
Flatten the dough out with your hands or use a rolling pin to help. If some raisins fall out, just pick them up and stick them in the center of the dough. Shape the dough into a rectangle; the short side should be the same length as your loaf pan (if you’re using one).
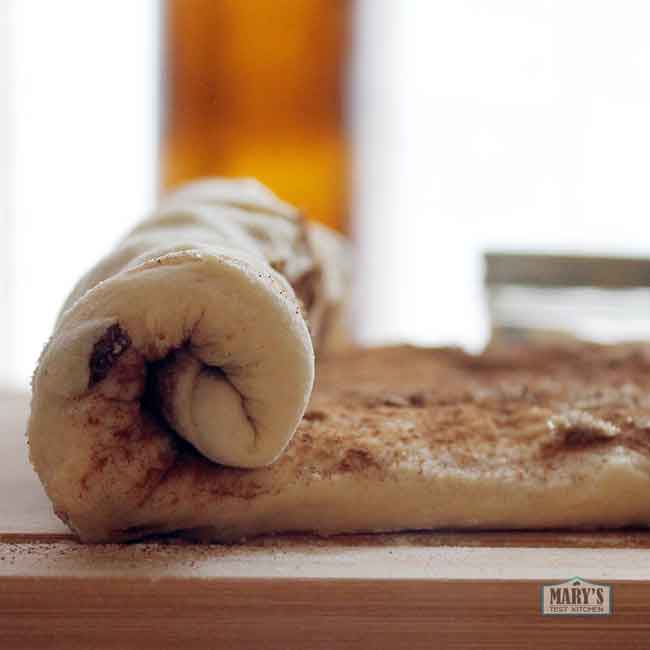
You can spray or brush on a thin layer of water to help the fillings stick. Then cover the entire surface with a tablespoon of cinnamon. Also sprinkle on some brown sugar. If I’m not going to add icing at the end, I’ll use up to three tablespoons of brown sugar. If I will be adding icing at the end, I may add one tablespoon of brown sugar or none at all. The sweetness level is really up to you.
Then roll up the dough tightly starting from one of the short ends. Roll the dough right on to the other end, seam at the bottom.
Generously grease your loaf pan or baking sheet with vegan butter or refined coconut oil. Don’t use unrefined coconut oil unless you want your raisin bread to smell like coconut.
The second rise
Transfer the rolled dough into the pan or arrange it in the middle of your baking sheet and cover again with a clean damp kitchen towel. Let it rise like before for about an hour or until the loaf has doubled in size.
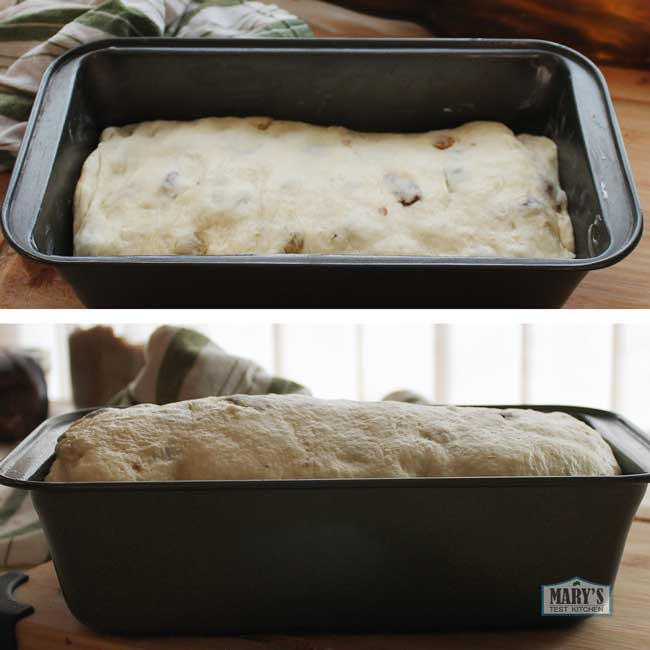
Then preheat your oven to 350°F or 175°C. Only when the oven is fully preheated (the oven’s preheat light will go out), place the uncovered loaf on the center rack. Bake the loaf for 35 minutes or until the top is golden brown. Transfer it to a rack to cool for at least 20 minutes before icing the loaf or slicing into it.
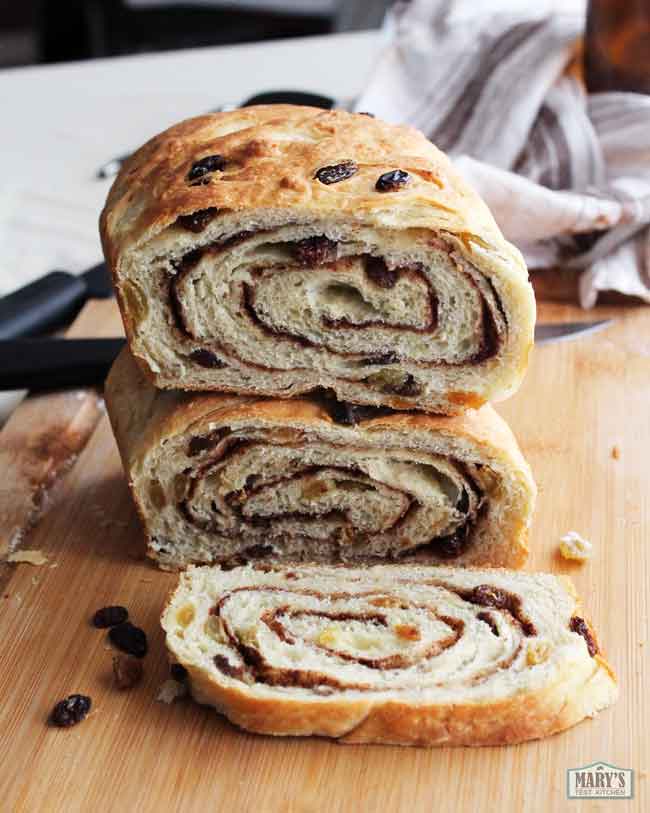
You don’t have to glaze this loaf for it to be amazing. Brush on a little syrup wash before baking to achieve a nicely browned top.
Finishing the Vegan Raisin Bread with Icing
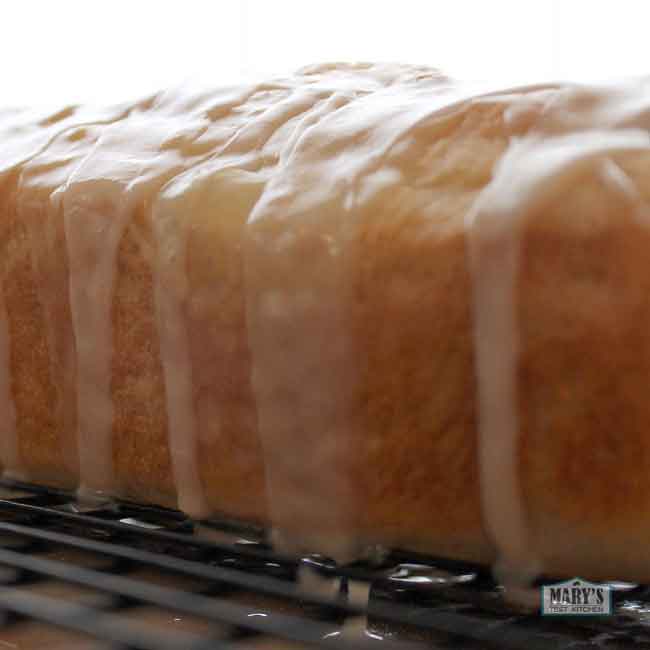
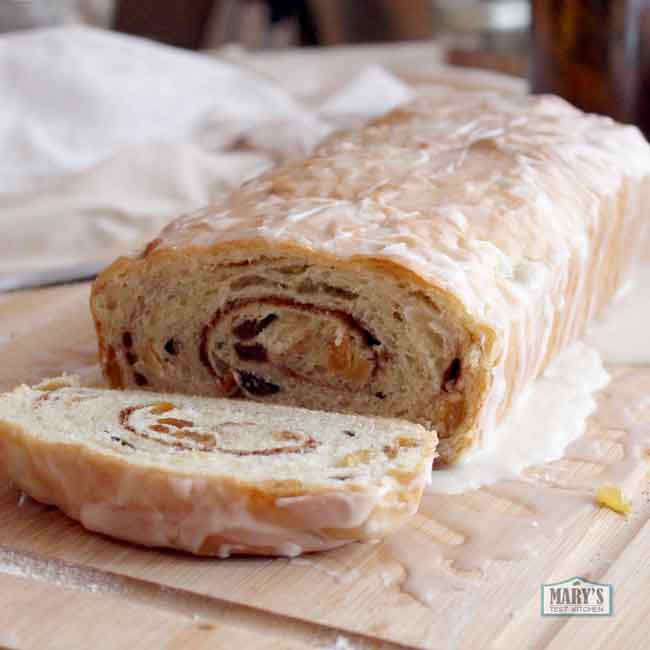
When the bread has cooled to room temperature (or pretty close; a tiny bit warm is OK), you can make the icing. Simply mix a cup of icing sugar with a teaspoon of vanilla and a couple teaspoons of water or plant-based milk. It’ll look like not enough liquid at first, but just keep mixing until a smooth glaze emerges from the powder. This plain vanilla sugar glaze is the type that will firm up and have a dry finish when it’s totally set.
Place a baking sheet to catch dripping glaze under the cooling rack and drizzle the glaze over the loaf. It will take about 30 minutes for the glaze to set. Slice and enjoy! This vegan raisin bread with icing is best enjoyed on the same day or the day after.
Storage
Fresh bread like this is best enjoyed right away but if you have leftovers, just store them in container and you can keep them at room temperature or in the fridge. You can also freeze them for later. Wrap individual slices in plastic wrap or parchment paper, then place in a freezer bag. They should keep for up to a month. You can thaw them quickly in the microwave; just zap for 15 to 30 second intervals until warm. Or you can let them thaw in the fridge or on the counter.
Printable recipe for Vegan Raisin Bread with Icing
Vegan Raisin Bread with Icing

Is it vegan raisin bread or the most delicious, luscious cinnamon roll in loaf form? Make this easy homemade recipe and decide for yourself!
Ingredients
Bread Dough
- 300g (2 1/3 cups) all-purpose flour*
- 237ml (1 cup) warm plant-based milk, 110°F
- 2 1/4 teaspoons (1 envelope) instant yeast
- 3 tablespoons vegan butter or refined coconut oil, softened
- 3 tablespoons sugar
- 1/4 teaspoon salt
- 1 cup raisins
Filling
- 1 tablespoon cinnamon
- 1-3 tablespoon brown sugar**
Icing
- 1 cup icing sugar
- 1 teaspoon vanilla extract
- 2 teaspoons water or plant-based milk
Instructions
- In a large mixing bowl (or in your stand mixer bowl), combine all-purpose flour, sugar, salt, vegan butter (or refined coconut oil), instant yeast and raisins.Mix well, then add the warm plant-based milk.
- Turn your mixer on to the lowest setting or stir with a spatula or your clean heads until the dough comes together. If you’re using a stand mixer, you may need to stop it after a minute and scrape down the sides of your bowl. Continue mixing and stopping occasionally until your dough comes together, then continue mixing for a minute or so more. If you’re kneading manually, knead the dough for 5 to 10 minutes. Shape the dough into a ball.
- Cover the bowl and let the dough rise until doubled in size; about 45 minutes to 1 hour 15 minutes.
- When your dough has doubled in size, transfer it to a lightly floured work surface. Flatten and shape the dough into a rectangle; the short side should be the same length as your loaf pan (if you’re using one).
- Spray or brush on a thin layer of water to help the fillings stick. Cover the entire surface with a tablespoon of cinnamon. Also sprinkle on brown sugar evenly. Use one tablespoon of brown sugar if you'll be adding icing later; use up to three tablespoons if you will be omitting the icing.
- Roll up the dough tightly starting from one of the short ends. Roll the dough right on to the other end, seam at the bottom.
- Generously grease your loaf pan or baking sheet with vegan butter or refined coconut oil. Don’t use unrefined coconut oil unless you want your raisin bread to smell like coconut. Transfer the rolled dough into the pan or arrange it in the middle of your baking sheet and cover again with a clean damp kitchen towel. Let it rise like before for about an hour or until the loaf has doubled in size.
- Preheat your oven to 350°F or 175°C. When the oven is fully preheated, place the uncovered loaf on the center rack. Bake the loaf for 35 minutes or until the top is golden brown. Transfer it to a rack to cool for at least 20 minutes before icing the loaf or slicing into it.
- When the bread has cooled to room temperature (or pretty close; a bit warm is OK), make the icing. Stir the ingredients together until a smooth glaze emerges from the powder. Place a baking sheet to catch dripping glaze under the cooling rack and drizzle the glaze over the loaf. It will take about 30 minutes for the glaze to set. Slice and enjoy! This vegan raisin bread with icing is best enjoyed on the same day or the day after.
Notes
*Because of natural flour variations and even factors like humidity, you may require a little more flour. If your dough is sticking a lot, you may want to work in some extra flour. Go with one extra tablespoon at a time and stop when the dough is workable by hand. It can be a little tacky but should be pretty easy to get off your hands.
**I use only 1 tablespoon of brown sugar if I'll be adding icing afterwards. If not, I'd use 3 tablespoons of brown sugar in the filling.
While all good yeast breads take time to make, a lot of that time is hands-off so you don’t have to wait around in the kitchen. It will take 3 hours to complete this recipe - don't let that put you off. Each slice of this glorious bread will be well worth your patience.
Use a 9.5" x 4.25" loaf pan for this recipe or you can make a free form loaf on a sheet pan.Note: This recipe is not gluten-free and, unfortunately, the all-purpose wheat-based flour in this recipe cannot be substituted simply with an all-purpose gluten-free flour.
Nutrition Information:
Yield:
8Serving Size:
1Amount Per Serving: Calories: 294Total Fat: 8gSaturated Fat: 5gTrans Fat: 0gUnsaturated Fat: 2gCholesterol: 16mgSodium: 137mgCarbohydrates: 54gFiber: 2gSugar: 34gProtein: 5g
Nutritional Information automatically calculated by a plugin and may not be correct.


I like cinnamon, but I love orange. I think I will try this one w/ orange.
Just made this and it came out amazing! Thank you! But I needed much more than 2 teaspoons of liquid to create glaze. Could that have been a typo?
I’m glad it came out well! No, 2 teaspoons of water/milk + 1 teaspoon of vanilla extract for the liquid is not a typo. 1 tablespoon total of liquid to one cup of icing sugar is the right amount to make a glaze. If it looks dry at first just keep stirring. Otherwise, the glaze is too thin for what you see in the pictures. However, maybe you packed your one cup? that can change the amount you actually get when measuring. Either way, sounds like you made it work for you 🙂
I just made this and it was amazing! I did have to use a bit more flour to make the dough less fluid, and also more liquid for the icing to make it pourable. But the end result is sooo delicious. I used jumbo flame raisins to go all in on the raisin part, and they really ad sweetnes and texture.
Honestly you’re my absolute favourite vegan food blogger and inspiration so a BIG Thank you for all your recipes, tips and ideas. So grateful!!
Thank you so much for your wonderful comment, Else. I’m so happy you enjoyed this raisin bread recipe 🙂
Cheers,
Mary
Family loved it!! Thank you!
You’re most welcome, Ash! I’m so happy your family enjoyed it 🙂
Cheers,
Mary
I made a loaf today ( my second time using this recipe). I made a cinnamon raisin and a cinnamon swirl (needed another 1/3 cup flour). I am super pleased with the way they turned out. So delicious and really nice looking. Thank you!
That’s awesome, Astrid! Your kitchen must smell so cozy right now. Thanks so much for sharing <3
Cheers,
Mary
I made this and it was fantastic. Thanks for your recipe.
I made this bread today it is delicious! I followed the recipe exactly, I did use coconut oil and it worked perfectly. I did not frost it and we thought it was sweet enough for us.
I just made a loaf of this delicious bread today…it came out amazing!
I used active, dry yeast (didn’t have the instant kind) and proofed and activated it in the 1 cup of plant milk (I used oat milk, heated to 110 deg Fahrenheit as suggested).
I also used a tablespoon of plant butter instead of water to moisten the rectangle of dough before sprinkling on the cinnamon and brown sugar.
Oh, and also used bread flour instead of all purpose.
Didn’t make the icing so used 3 Tablespoons of brown sugar and the bread is still pretty decadent! 😀 Thank you soooooo much for taking the time and effort to post this recipe!