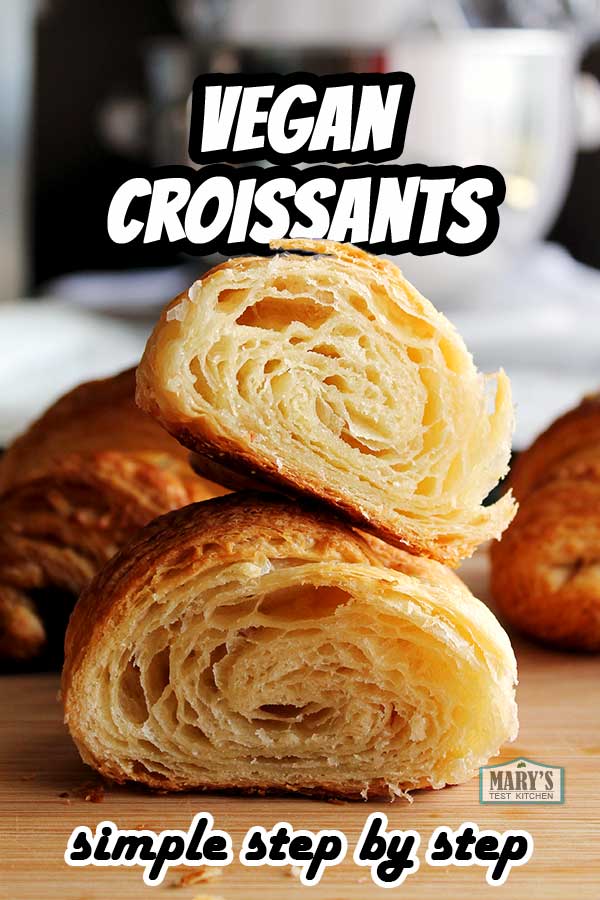
You can make delicious, flaky and buttery vegan croissants at home! Dairy-free classic French croissants, cheese croissants or pain au chocolate (chocolate croissants) are all within your reach. Plus, the steps to make proper vegan croissants are simple and the results are so satisfying. But the whole process takes 2 to 3 days so get your ingredients and start now!
Skip to the recipe.
Pin this recipe.
Video tutorial for How to Make Vegan Croissants 3 Ways
- Make the dough 0:23
- Make the “butter” square 1:37
- Make your dough + butter package 2:34
- Lamination stage (3 turns) 3:30
- Cut out, shape & prep croissants 14:24
- Bake & finish croissants 9:11
How to Make Vegan Croissants from Start to Finish
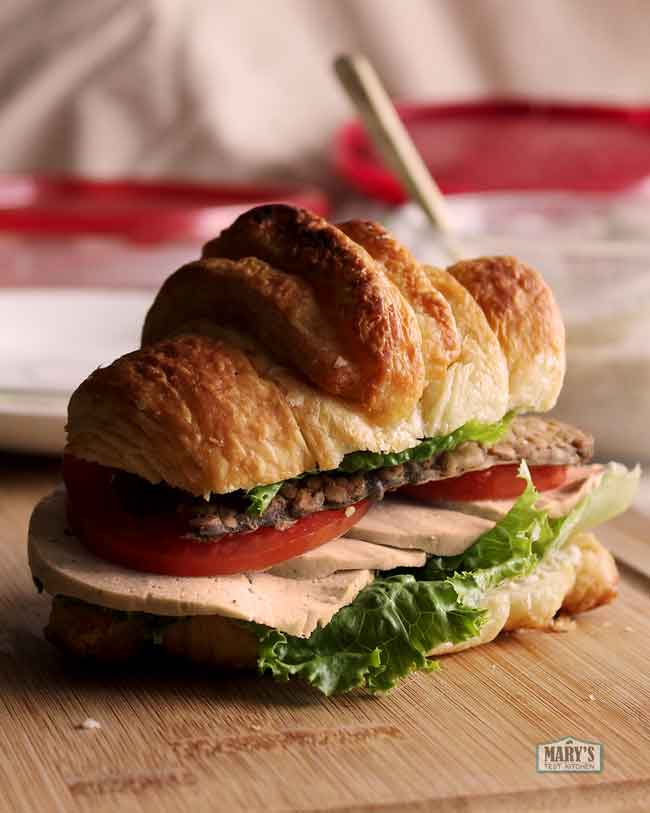
Whether you want to make classic plain buttery vegan croissants, vegan cheese croissants, vegan pain au chocolat or fill them with rich, creamy vegan hazelnut spread, start by making the same croissant dough. I know this fancy French baking can be intimidating, especially for beginner bakers, but the process is actually simple. Anyone can make croissants with some patience.
It is a multi-day process taking place over a minimum of 2 days, ideally 3 but up to 6 if you want to make the dough ahead. On the first day, we’re going to make the dough and a square of butter. Then on the second day, wrap the vegan butter in dough, roll out and fold up three different times. This process is called lamination and will create the flaky texture of the finished croissants. Finally, on the third day, we’ll roll it out once more, shape the croissants and bake them. So for brunch on Sunday, start the dough on Friday evening or earlier (up to 3 days ahead).
Vegan Croissant-making Timeline
Day 1 – Make dough square 10.25″ (26 cm) & butter square 7.5″ (19 cm) and chill overnight
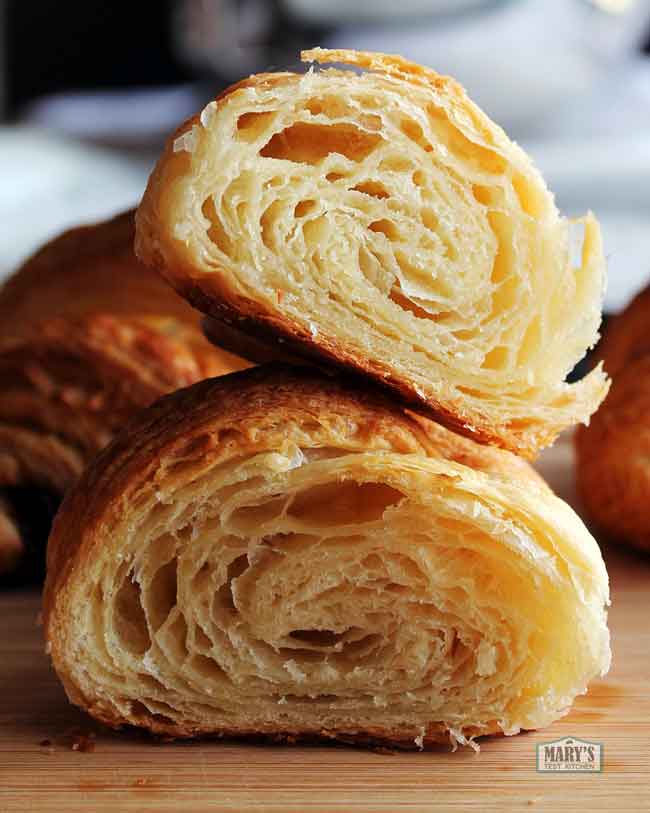
Day 2 – Wrap butter square with dough and laminate (roll out to 24″x 8″ or 60 cm x 20 cm, make a series of folds 3 times, chilling at least 30 minutes up to 24 hours between each “turn”) resulting in 64 layers.
Day 3 – Shape dough ( 43″ x 8″ or 110 cm x 20 cm), cut & roll, let rise (2 hours), and bake about 30 minutes total
Read on for the process in more detail.
Vegan Croissant Ingredients
Most of the ingredients for making vegan croissant dough will be easy to find in any supermarket baking aisle: flour, instant yeast (traditional will also work), salt, and sugar. Also, most grocery stores these days carry some kind of vegan plant-based milk. I prefer soy but any vegan milk that you like will do. In a pinch, you can also go for water instead of milk for a slightly less rich dough. See the printable recipe for exact amounts.
The more challenging ingredient in traditional French croissant recipes to replace is butter. Butter is not just solid fat. Otherwise we could just replace it with one of the many butter-flavoured coconut oils on the market. Dairy butter is actually an emulsion of fat, protein and water. When raw croissant dough is baked, the fat melts and the water turns to steam, lifting the layers apart and creating that classic croissant flaky texture. That’s why I turn to using vegan butter alternatives that are similar to dairy butter in composition.
Depending on where you live, vegan butter may be a little more difficult to find. Check to see if your local supermarkets have a “natural foods” aisle or health food section. Some stores will even stock the vegan butter near the regular butter (as they do at my local Calgary Co-op store). Depending on where you live, you may even order vegan butter online. But which one to buy?
Types of Vegan Butter Best for Vegan Croissants
For a pastry that is well known for being full of butter, croissant dough is fairly easy to veganize. That is, it’s easy thanks to the myriad of dairy-free butter alternatives on the market today. There are two readily available in my local grocery stores: Earth Balance and Melt plus softer ones like Becel’s vegan variety. Unfortunately, the soft styles are very hard to work with. The laminating process gets messy and the fat leaks out everywhere! Melt Butter Sticks do work but I find, like their name unfortunately suggests, the product melts fairly quickly, requiring me to stop during the lamination stage more frequently to chill the dough. Plus, it has a coconut flavour.
For the best flavour and for the vegan butter that makes croissant making as easy as it can be, I prefer Earth Balance Buttery Sticks. To me, Earth Balance tastes the most like dairy butter. The Sticks are a little harder to find than the Buttery Spread but they will make life easier. If you can only find the tubs, you can still use it. Just do the best you can when it comes to measuring out and forming your vegan butter square.

Vegan butter square to go into the croissant dough.
Finishing Ingredients for Classic, Cheese, and Chocolate Croissants
For all the croissants, I like to brush the unbaked tops with diluted maple syrup to help achieve a beautiful golden brown colour during baking.
For cheese croissants, you’ll need about 2 tablespoons of vegan cheese shreds for each vegan cheese croissants you are making. Vegan parmesan is optional.
For Chocolate Croissants (AKA Pain Au Chocolat), you’ll need two thin sticks of vegan chocolate for each vegan pain au chocolate. Fortunately, vegan chocolate isn’t hard to find since dark chocolate doesn’t require dairy. Just check the ingredients. Swiss chocolate bars are often formed so you can break off squares easily so just break along a row to create a thin stick about three squares wide.
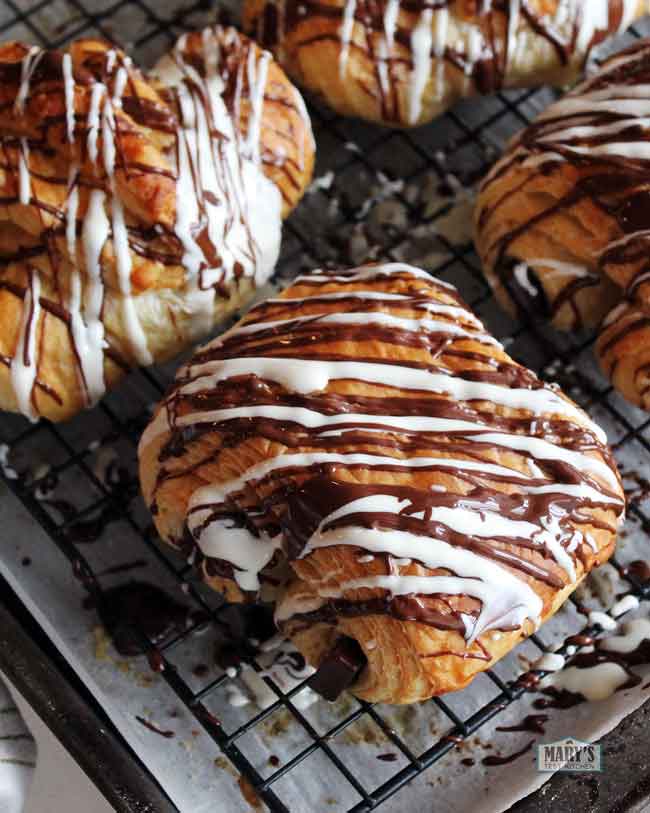
For decoration, I also like to melt down some of the dark chocolate to drizzle over the tops after the chocolate croissants are baked. I was also able to find some vegan white chocolate for contrast. For my fellow Canadians, check out London Drugs (an unexpectedly good source for vegan snacks!)
Equipment for Making Vegan Croissants
Making vegan croissants require no special equipment; just the regular baking stuff and items you probably have in your kitchen already.
You’ll need:
- a kitchen scale for measuring flour & measuring spoons
- a mixing bowl (you may use a stand mixer)
- a rolling pin
- a ruler
- a sharp knife or pizza slicer
- a parchment or wax paper
- Optional 1 – 2 large resealable bags such as freezer bags
- Optional cooling rack (especially good if you’re drizzling chocolate after baking)
I highly recommend using a kitchen scale to measure flour rather than using measuring cups to be more accurate. A good kitchen scale that can measure to the gram is really invaluable in my kitchen and you can buy one for under $20. However for this bread recipe, if you only have measuring cups, it’s okay. A little extra flour won’t kill this recipe. It’s more important if you’re making something with a very wet dough or when you’re making something like cake.
Day 1 Make Vegan Croissant Dough and Dairy-Free Butter Square
Making the Croissant Dough
Start with the flour. Measure out 500 grams of all-purpose flour (regular, NOT gluten-free). 500 grams should measure out to be 4 US cups and 3 tablespoons but as I mentioned before, it’s more accurate to use a kitchen scale that can measure to the gram. Combine the flour with instant yeast, sugar and salt. Again, for the exact measurements, skip to the printable recipe.
If all you have in your cupboards is Traditional yeast (AKA Dry Active Yeast), you’ll have to bloom it in warm water first. Instead of using cold water, use warm water and mix it with a teaspoon of the sugar. Stir in the traditional yeast and wait about ten minutes. The yeast will dissolve in the water and start bubbling and foaming. If it does not, this means the yeast may be dead and you’ll need to get a new batch.
On that note, if you’re using instant yeast as I recommend in the recipe, but your yeast has been sitting in the cupboards for a while, you might want to test that it’s alive by blooming it as well. As with the traditional yeast, you’d simply mix it with warm water and sugar and wait for it to bloom.
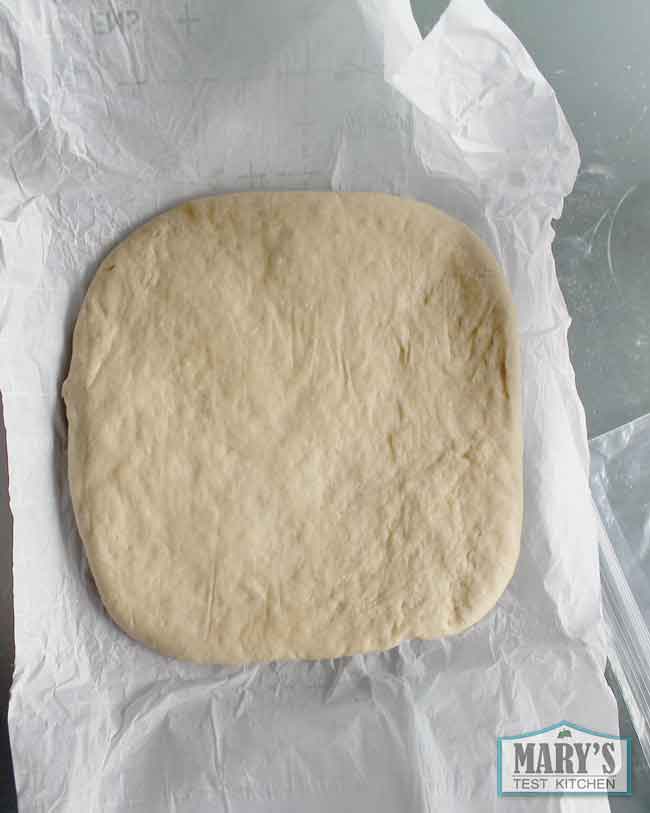
Add the water (with bloomed yeast or not), cold plant-based milk, and softened room temperature vegan butter to the dry ingredients and mix to form a dough. You can use a stand mixer on low speed for about 5 minutes for the dough to come together. Knead it a few times out of the bowl, then roll it into a square shape about 10.25″ (26 cm) on each side. You don’t have to be exact at this point but it’ll make tomorrow easier. Wrap it up in parchment or wax paper so it doesn’t dry out. Optionally put it in a freezer bag to make sure all the moisture stays in. By the way, unlike other bread recipes, you don’t want the yeast to start working right away so get it in the fridge as soon as you can. Chill for 12 to 24 hours.
Making the vegan butter square
Prepare a large piece of parchment or wax paper that will help you form the sticks of butter into a perfect square shape. Fold the sides of the paper in so that 4 creases form a 7.5″ (19 cm) square. You want enough extra paper around the sides to completely envelop the butter in the middle.
Then, cut your 2 vegan buttery sticks along the lengths to make 4 to 6 slabs. Place them in the middle of your parchment square. Fold over the edges of the paper and flip the package so the ends are tucked on the bottom. Then flatten the butter with a rolling pin. Start from the middle and roll outwards so the butter spreads to the edges of the package but stays even in thickness. Don’t press too hard or the paper will break but don’t be afraid to use a little force. Optionally wrap this square in a freezer bag to keep things tidy. And chill in the fridge until the next day.
Day 2 Lamination
Dust the dough lightly with flour and roll it out into a 10.25″ (26 cm) square. You want it to be as close to a perfect square as possible, flat and even. Since it has been resting in the fridge so long, the gluten – which is the protein in wheat which makes dough bouncy – will be relaxed. The dough should be pretty easy to roll out.
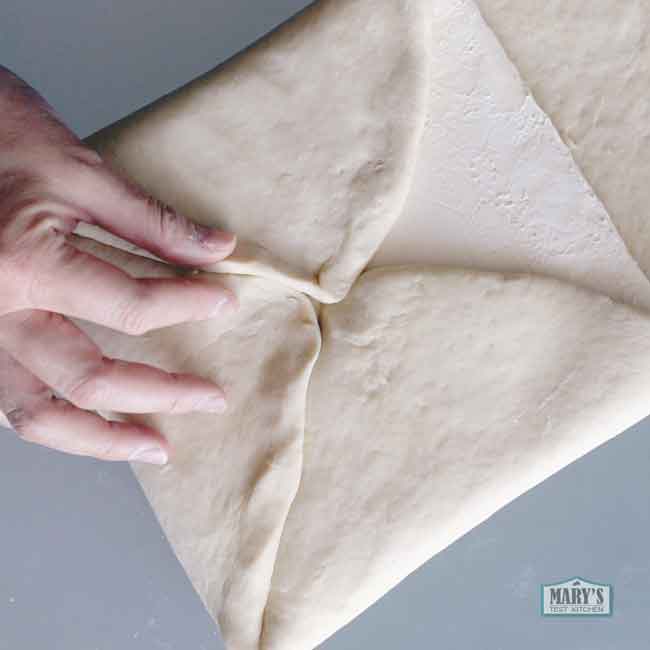
Unwrap your vegan butter square and place it with the angles pointed to the halfway points of each edge of the dough. Then fold the corners of the dough snugly over the edges of the butter, bringing the points to meet over the center of the butter. The edges of the dough should be able to meet and slightly overlap. Press and seal the edges together so that the vegan butter is completely enveloped. Now you can roll it out for the first round of lamination.
To flatten the dough square and the vegan butter within evenly, press down with your floured rolling pin across the center of the dough and repeat up and down that length pushing straight down. Continue slowly to flatten and lengthen the dough but try to keep the sides straight and even at the same time.
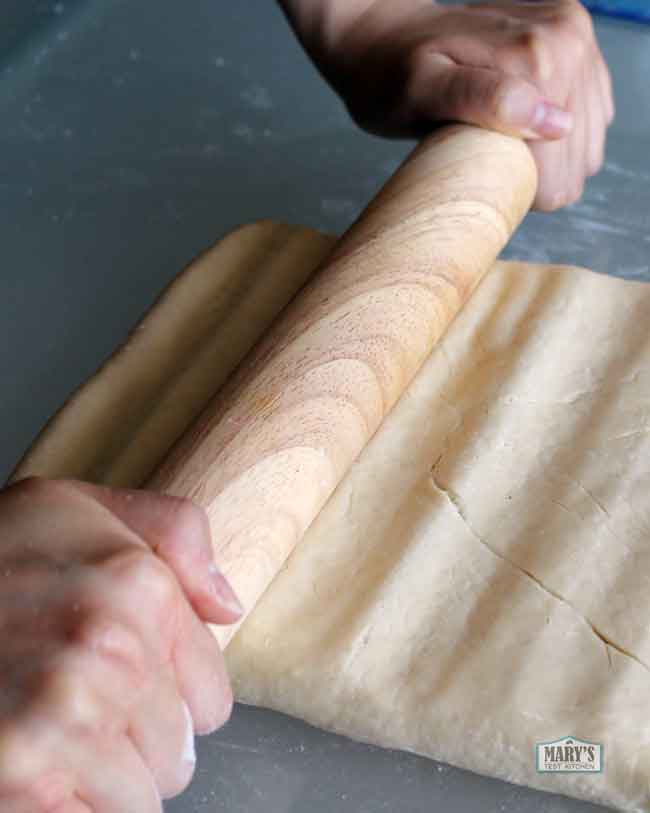
Slowly roll up and down the length, pushing in only one direction at a time; aiming for 60 centimetres or 24 inches long and about 20 centimetres or 8 inches wide. You can pat the sides in if they are getting wild and too wide.
From time to time, add flour underneath and to your rolling pin to prevent sticking and tearing the dough.
The dough should flatten out fairly easily. If it springs back that means the gluten has tightened and you should wrap it back up and send it to the fridge to relax for a half hour or so before continuing.
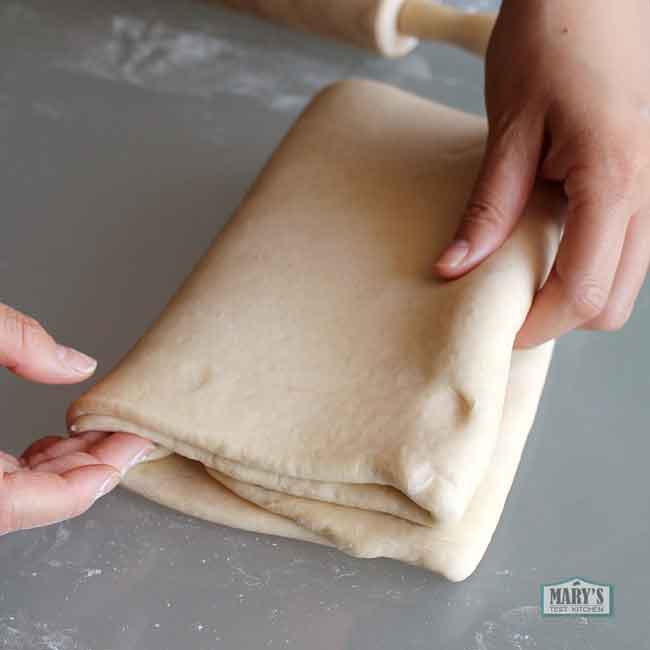
When it’s long enough, dust off any excess flour. Then fold one end about 2/3 of the way to the other side and fold the other end in so that the two ends meet. Now we have two layers of butter in there.
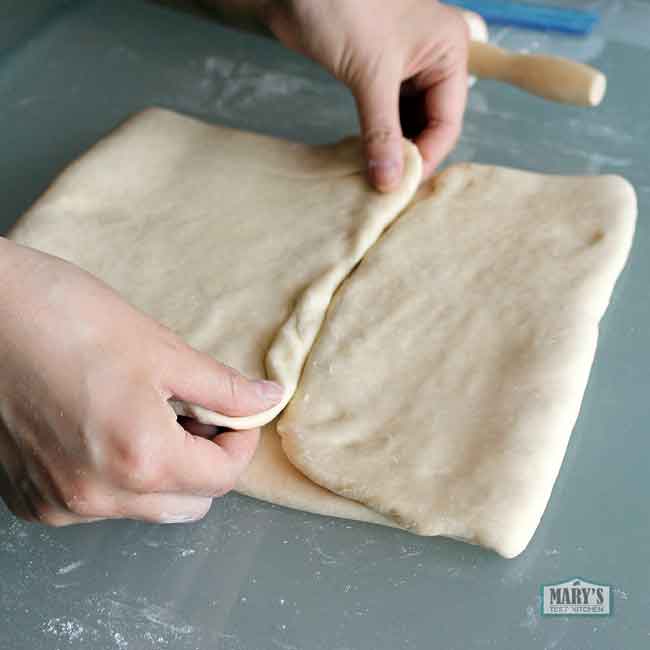
Nudge the edges together without pulling or pressing too much. We don’t want to create weak spots which will tear the dough and reveal the butter inside.
Then fold the top down again, this time all the way to the new bottom edge. Just in half like a book. Now there are four layers of butter.
Time to wrap things up again so this dough can relax and the butter can chill in the fridge for at least a half hour. If you have things to do – your life is busy, you can get back to it at any time – even up to an entire day.
When you’re ready, it’s time for turn two. Place the dough down so a short end is facing you. Flatten the dough like before, pressing straight down across the width, up and down the length. Then roll the dough out to 24″ x 8″ (60 cm x 20 cm). Fold again 2/3 of the way to the other side and fold the other end in so that the two ends meet. Then in half like a book. This will give you 16 layers of butter. Return the dough to the fridge for another 30 minutes before repeating this process one more time for a total of 64 layers. After this, put the dough away in the fridge for the day; you can bake the next day or up to 3 days later.
Day 3 Shape and Bake (and Eat!)
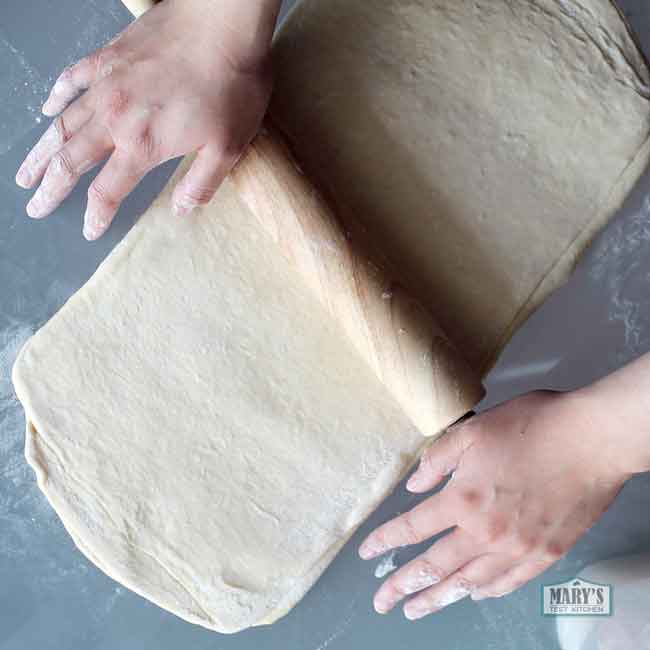
It’s our last time rolling out so by now you’re a pro right? Flatten the same way as before. However this time, we’re going to roll the dough even longer: 43″ (110 cm) long and 8″ (20 cm) wide. Also, go ahead with that flour if you need it. At this stage, after all this time, you want to continue to be careful so the dough doesn’t tear. You can always brush off excess flour.
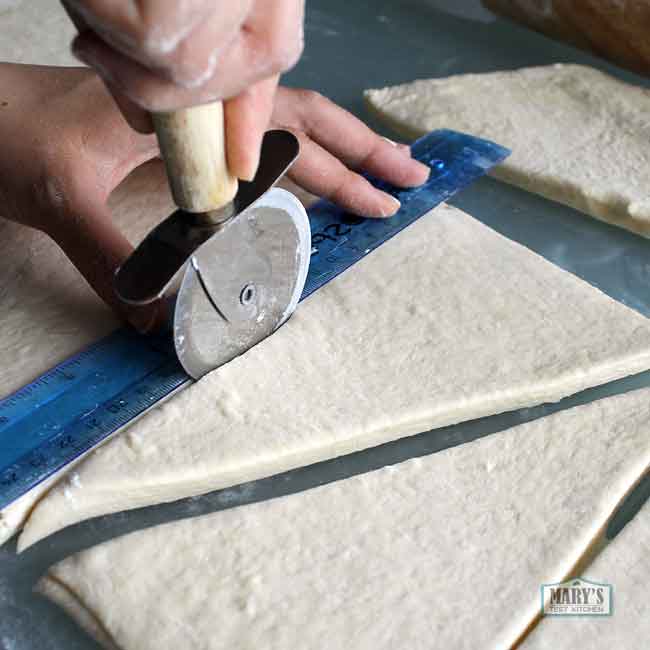
Finally, we have our super long sheet of finished croissant dough. Time to cut. If you’re making classic crescent shaped croissants, you will cut out triangles. On one side, make a mark at every 5″ (12.5 cm). Along the other length, make a mark at 2.5″ (6.25 cm), then mark at every 5″ (12.5 cm) after that. Now use the ruler’s edge and a sharp knife or pizza slicer to cut, joining the cut marks on either side to make triangles. One batch can make 12 crescent shaped croissants.
For the classic croissant shape, gently stretch the bottom edge of the triangle making it a bit wider. Gently stretch along the length as well.
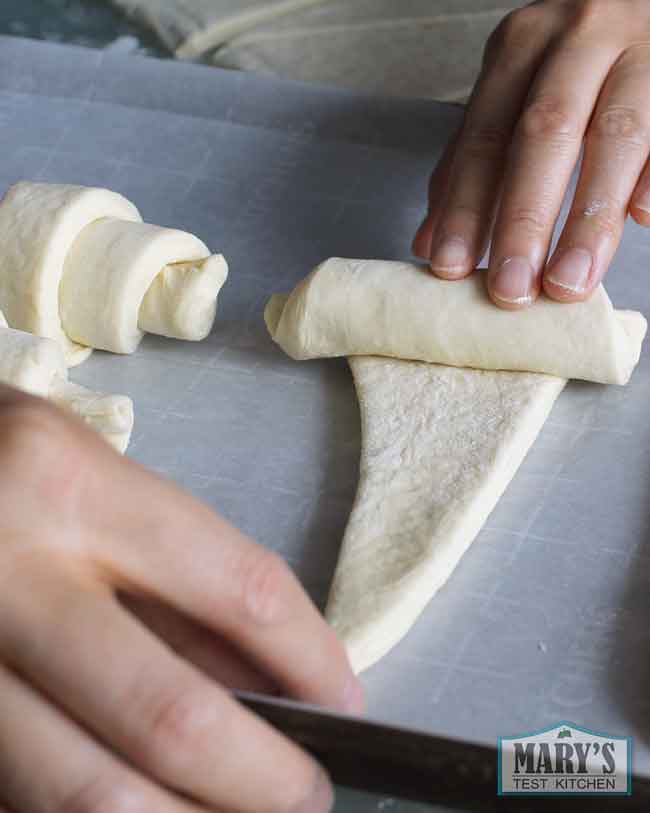
And roll up as tightly as you can while handling the dough, you guessed it, gently. You can use your palm to push it along to prevent finger marks. The more tightly you roll the dough, the better final texture of the croissant. If you don’t roll tightly enough, the layers will get air pockets where you’ll see some separation. Finally, make sure the tip of the tail ends up on the bottom so it stays tucked during baking.
For cheese croissants, place the vegan cheese shreds in a triangle shape about 1 cm in from the edge of the dough. Roll up as tightly as you can, finishing with the tip of the triangle under so the rolls stays secure during baking.
For hazelnut croissants, after stretching the dough out, add a heaping teaspoon of vegan chocolate hazelnut spread near the base of the triangle. Fold over and tuck in a little so the hazelnut spread is well enclosed. Then gentle roll up as tightly as you can, finishing with the tip of the triangle under so the rolls stays secure during baking.
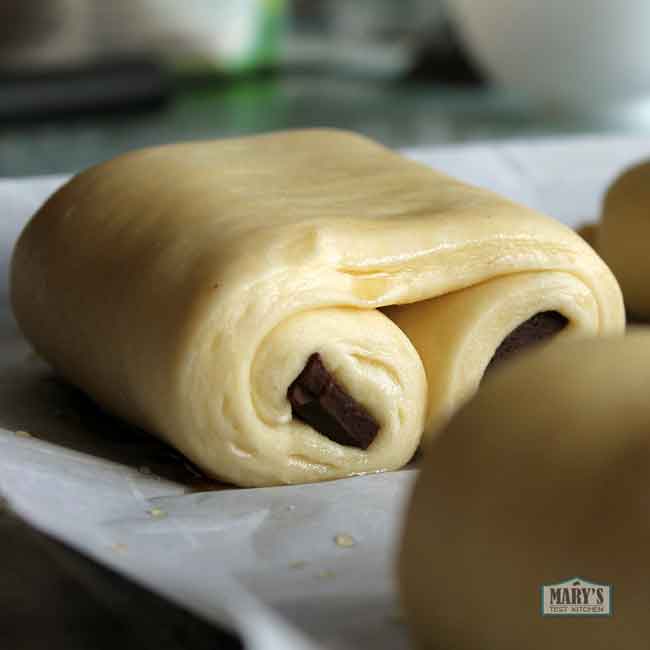
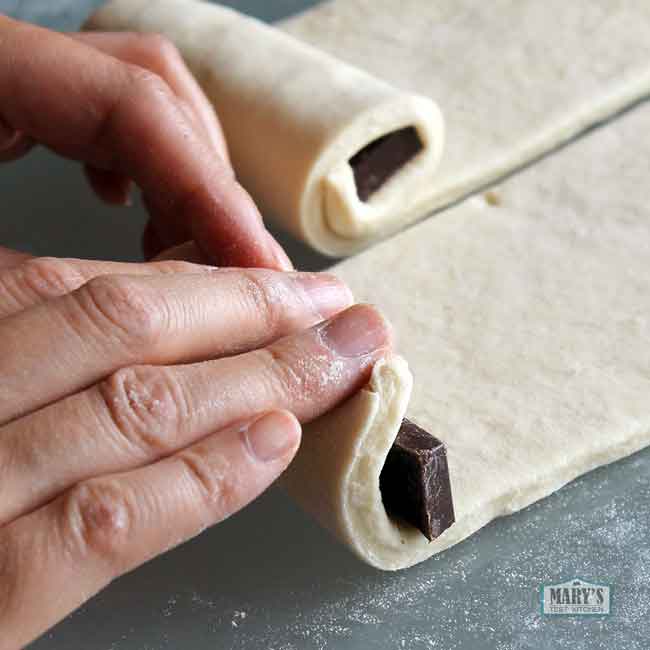
Chocolate croissants are usually square shaped. For those, cut straight across the width of the dough to make long rectangles. Then you can lay two chocolate sticks on either end and roll up to the middle.
The Final Rise
The croissants need to rise one final time but stay covered so they don’t form a dry skin on the surface. I use a couple of tall glasses to act as tent stands, then drape plastic wrap over top. The dough will double in size so make sure there’s room for expansion without contact with the plastic. You can also flour the inside of the plastic so if there is contact, it won’t tear the surface of the dough.
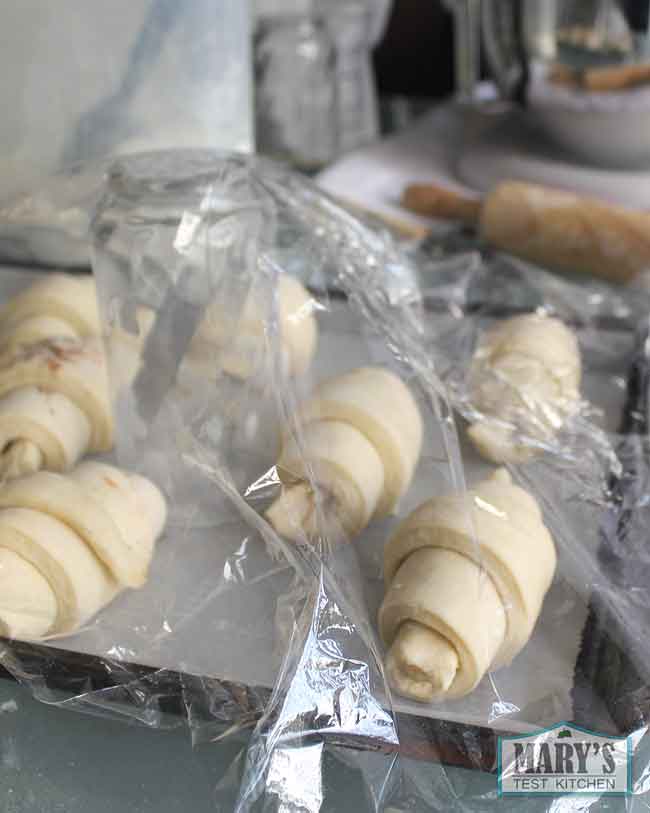
Let them rise in a warm location. In case it’s a cold day where you are, place them in your cold oven with just the oven light on. The oven light will make it a bit warm in there so the dough will rise nicely protected from drafts.
This will take about 2 hours. I know 2 hours is a long time but with all the work you’ve put into these croissants, a little more patience will really pay off.
During the last 20 minutes, take the dough out and start preheating your oven to 400°F.
Baking Croissants
The croissants should be twice as large as before. You’ll see the layers defined more clearly.
To give them a nicer colour, make a wash of one part maple syrup and two parts water. Brush on this syrup wash carefully, and again, gently.
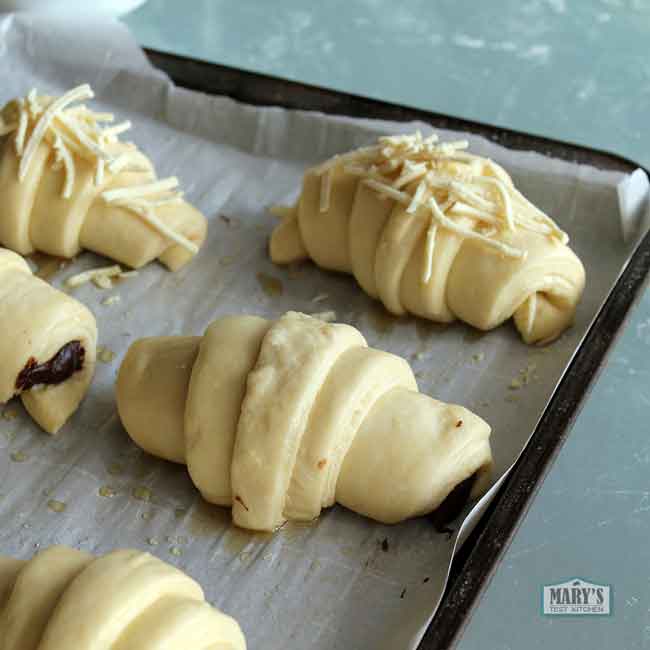
For the cheese croissants, you can add some extra cheese shreds at this point.
And they are ready!
When the oven is totally preheated, bake them for ten minutes at 400°F.
Then, without moving them at all, lower the oven’s heat to 350°F and continue baking for 20 minutes. They should be nice and crispy looking deep golden brown on top when they come out.
Troubleshooting
If you took out your croissants early (or maybe your oven runs a little cool) and found they were not cooked all the way through after baking, not all is lost! Just put them back in the hot oven at 350°F for another 15 minutes or so. Watch so they don’t burn.
When I moved here to Calgary, I found that dough tended to rise faster and bake up nicer than when I lived in Vancouver. I suspect it has to do with humidity and/or altitude but in any case, I’ve gotten some feedback that it has taken some people longer to bake these. When in doubt, just bake for longer but watch so they don’t burn.

Because of the light coming in from behind these croissants, they look lighter than they are. You want them to be quite browned (not burnt though!)
Finishing the Croissants
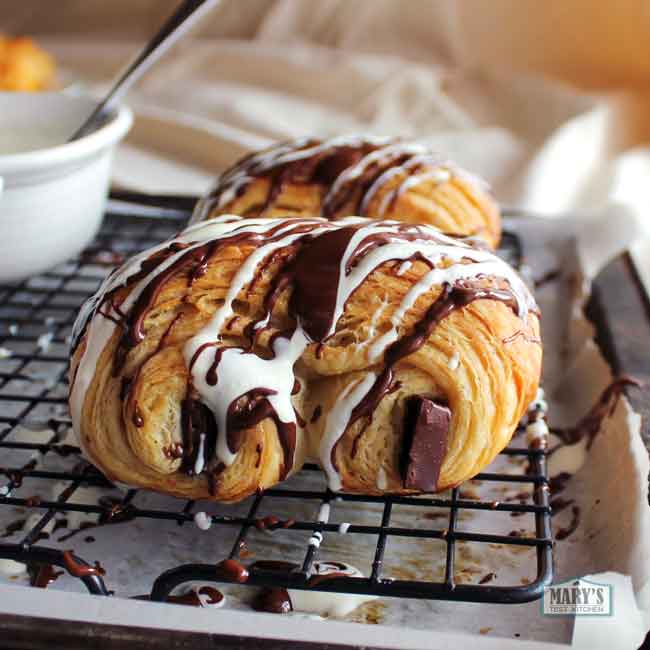
You can let them rest for five to ten minutes. Then let them cool on a cooling rack. If you’re taking pictures and want them to look shiny, you can add a bit of that syrup wash from before. However, this shine doesn’t last so take those pictures fast!
The wash is also nice if you want to sprinkle on some vegan parm or finishing salt too. As for me, I finished the hazelnut and chocolate croissants with vegan dark and white chocolate drizzle.
Which flavour of croissant would you make first? Or all of them at once?
Let me know what other flavours or variations you would make in the comments below. Or want to make. Or want to make someone else make. Is your birthday coming up? An anniversary? Someone owe you a favour? Send this recipe to your spouse, family or friends for a little hint hint.
Thank you so much for reading! I really really hope you enjoyed this recipe and somehow enjoy some vegan croissants!
Printable recipe for Vegan Croissants – Classic, Cheese and Chocolate
Vegan Croissants 3 ways (Classic, Cheese and Chocolate)
Delicious, flaky and buttery vegan croissants at home!! Crispy on the outside, tender and delectable on the inside, the dairy-free version of the classic French pastry is easier to make than one might believe. This recipe includes basic methods of how to make croissant dough, how to prepare the vegan butter square, how to laminate the dough to create the layers within the croissant pastry, and how to cut and shape the dough.
From there, you can make classic, plain buttery croissants, cheese croissants, chocolate hazelnut croissants, and the magnificent chocolate croissant AKA pain au chocolat.
--Making Croissants Timing--
Start 3 days before you plan to serve your croissants (2 days possible, 3 recommended, up to 6 days in advance)
Day 1 - Make dough & butter square
Day 2 - Laminate (roll out and fold 3 times, waiting at least 30 minutes between each "turn")
Day 3 - Shape dough, let rise (2 hours), and bake (about 30 minutes total)
For example, make dough and butter square on Friday night; laminate during the day on Saturday, then wake up early to shape the dough about 3 - 4 hours before brunch starts on Sunday.
Ingredients
Croissant Dough
- 500g all purpose flour (about 4 cups)
- 7g instant yeast (1 envelope or 2 1/4 tsp)
- 60g sugar (1/4 cup)
- 12g salt (2 tsp)
- 140ml cold water (1/2 cup + 1 Tbsp + 1 tsp)
- 140ml cold plant-based milk (1/2 cup + 1 Tbsp + 1 tsp)
- 45g vegan butter (room temperature, softened) (3 Tbsp)
Vegan Butter Square
- 227g vegan butter (2 sticks) very cold
Syrup wash (for all croissants)
- 2 tablespoon maple syrup
- 4 tablespoons water
For cheese croissants
- 2 tablespoons vegan cheese shreds for EACH croissant
For chocolate croissants
- 6 squares from a vegan chocolate bar (broken into two thin sticks) for EACH croissant
For chocolate hazelnut croissants
- 1 heaping teaspoon of vegan chocolate hazelnut spread for EACH croissant
Optional
- Additional chocolate for drizzling
Instructions
Day 1 - Make the Croissant Dough and Butter Square
- Combine flour, instant yeast, sugar, salt in a large mixing bowl. You may use your stand mixer.
- Mix in the cold plant-based milk, water, and 45g softened vegan butter. Keep stirring until the dough comes together. Remove from the bowl, knead it just a few times. Roll it into a square shape about 10.25" (26 cm) on each side. Wrap and refrigerate.
- For the butter square, prepare a piece of parchment paper or wax paper by folding the edges in so that the creases form a 7.5" (19 cm) square in the middle. Make sure there is enough material around the sides to completely envelop the middle.
- Slice up the sticks of vegan butter lengthwise to make 4 to 6 slabs. Unfold the paper and place the butter in the middle. Fold up the sides and flip so the ends are tucked under. Use a rolling pin to flatten the butter. Press the butter down with the rolling pin so that the butter spreads to the edges of the paper. Use enough force to spread the butter but not so much that you rip the paper. When the butter is evenly spread to form a square, refrigerate.
- Refrigerate both the dough and butter squares for 12 to 24 hours.
Day 2 - Laminate
Unwrap your vegan butter square and place it with the angles pointed to the halfway points of each edge of the dough. Then fold the corners of the dough snugly over the edges of the butter, bringing the points to meet over the center of the butter. Press and seal the edges together so that the vegan butter is completely enveloped by dough.
First Turn Flatten the dough square and the vegan butter within evenly by straight press down with your floured rolling pin across the center of the dough and repeat up and down to lengthen the square into a rectangle. Note that the dough should flatten out fairly easily. If it springs back that means the gluten has tightened and you should wrap it back up and send it to the fridge to relax for a half hour or so before continuing.
Roll in one direction to gently lengthen the dough without breaking through to the vegan butter layer. Pat the sides in to keep them straight. Aim for dimensions of 8" x 24" (24 cm x 60 cm) . Sprinkle flour as needed to prevent sticking.
Dust off excess flour before folding. Fold one end about 2/3 of the way to the other side and fold the other end in so that the two ends meet. Nudge the edges together without pulling or pressing too much. We don't want to create weak spots which will tear the dough and reveal the butter inside.
Fold the top down again, this time all the way to the new bottom edge. Just in half like a book. Now there are four layers of butter. Wrap dough in parchment (optionally in a freezer bag) so it can relax and the butter can firm up again in the fridge for at least a half hour.
Second + Third Turns Place the dough down so a short end is facing you. Flatten the dough like before, pressing straight down across the width, up and down the length. Then roll the dough out to 24" x 8" (60 cm x 20 cm). Fold again 2/3 of the way to the other side and fold the other end in so that the two ends meet. Then in half like a book. This will give you 16 layers of butter. Return the dough to the fridge for another 30 minutes before repeating this process one more time for a total of 64 layers. After this, put the dough away in the fridge for the day; you can bake the next day or up to 3 days later.
Day 3 - Shape and Bake (and Eat!)
Flatten the same way as before but roll the dough even longer than before: 43" (110 cm) long and 8" (20 cm) wide. Flour liberally to prevent any breakage; you can brush off any excess before cutting.
For crescent-shaped croissants, on one long side, make a mark at every 5" (12.5 cm). Along the other side, make a mark at 2.5" (6.25 cm), then mark at every 5" (12.5 cm) after that. Now use a ruler's edge and a sharp knife or pizza slicer to cut, joining the cut marks on either side to make triangles. One batch can make 12 crescent shaped croissants.
For the classic croissant shape, gently stretch the bottom edge of the triangle making it a bit wider. Gently stretch along the length as well. Roll up as tightly as you can while handling the dough gently. Make sure the tip of the tail ends up on the bottom so it stays tucked during baking.
For cheese croissants, place the vegan cheese shreds in a triangle shape about 1 cm in from the edge of the dough. Roll up as tightly as you can, finishing with the tip of the triangle under so the rolls stays secure during baking.
For hazelnut croissants, after stretching the dough out, add a heaping teaspoon of vegan chocolate hazelnut spread near the base of the triangle. Fold over and tuck in a little so the hazelnut spread is well enclosed. Then gentle roll up as tightly as you can, finishing with the tip of the triangle under so the rolls stays secure during baking.
Chocolate croissants are usually square shaped. For those, cut straight across the width of the dough to make long rectangles. Then lay two chocolate sticks on either end and roll up to the middle.
Place the croissants on parchment-lined baking sheets with about 2 - 3 inches of space between them. Keep in mind they will double in size during this final rising plus more as they bake. Tent them with plastic wrap to prevent a skin from forming on them as they rise. Use tall glasses (or similar) to act as stands so the wrap doesn't touch the croissants.
Let rise in a warm location protected from drafts for 2 hours or until doubled in size. During the last 20 minutes, preheat your oven to 400°F (205°C).
After rising, uncover the croissants. Mix maple syrup wash and gently brush on each croissant. For cheese croissants, now you can add additional vegan cheese shreds.
Bake at 400°F (205°C) for ten minutes. Then, lower the temperature to 350°F (177°C) and continue baking for 20 - 25 minutes or until they are deep golden brown on top.
Finishing Croissants
Rest croissants on the baking sheets for 5 to 10 minutes before transferring to a cooking rack.
Brush on a little bit more syrup wash if before sprinkling any finishing salt/herbs. For chocolate/ hazelnut croissants, drizzle on melted chocolate and let set.
Notes
Vegan Butter I recommend Earth Balance Buttery Sticks for this recipe. If you can only get the one in the tub, that's okay too. Melt Plant-Based Butter is OK but melts more easily and has a coconut flavour to it. Other hard vegan butters may work as well but have not been tested.
Troubleshooting BakingIf you took out your croissants early (or maybe your oven runs a little cool) and found they were not cooked all the way through after baking, not all is lost! Just put them back in the hot oven at 350°F for another 15 minutes or so. Watch so they don't burn.
Nutrition Information:
Yield:
12Serving Size:
1Amount Per Serving: Calories: 308Total Fat: 9gSaturated Fat: 5gTrans Fat: 0gUnsaturated Fat: 3gCholesterol: 20mgSodium: 508mgCarbohydrates: 50gFiber: 2gSugar: 11gProtein: 7g

I made croissants according to your recipe for eastern and they turned out great! At the last roll out I decided to stop earlier as my dough did not seem to want to be stretched any thinner, but the croissants still looked like they were store bought and the taste was perfect. I shared them with a non-vegan who also recommended the taste, so thank you for this recipe.
Yay! I’m so happy to hear about your success! Thanks so much for your comment 🙂
Cheers,
Mary
These are delicious! Sadly I burnt them pretty badly after only 12 minutes (I think my oven thermometer is off, plus I shouldn’t have used the fan forced setting on the oven and left them unattended) but I just scraped the burnt bits off and they were still amazing. I did them in two days rather than three. Will definitely be mking these again and will try. not.to.burn them next time!
Oh My goodness!! I’m so sad for your burnt croissants. But glad that they were still delicious! Yes, I think turning on the fan speeds up the baking time so it’s probably better to leave it off next time. Thanks so much for sharing your experience, Heather. Best of luck for next time 🙂
Cheers,
Mary
Thank you so much for such an amazing detailed recipe plus video! My boyfriend is from France and I have been too intimidated to try making them. Quarantine bread making has upped my confidence and I’m ready to try! I super appreciate you using weights in the recipe too. Quick question, when you said you don’t recommend the Becel were you referring to their margarine in the tub or the new butter sticks? I have been using the new stocks in other recipes and the flavour is soooo good. I just wanted to make sure it was those you were referring to and not the margarine before I try to find the Earth Balance. Thanks again for taking to time to post such a detailed recipe!
Hi Laura,
Thanks for your kind words. I was referring to the Becel tubs – I haven’t seen them in stick form. Please let me know how it goes if you decide to use those. Good luck!
Cheers,
Mary
Those Becel baking sticks are stupid-good, right? Did you use them for croissants Laura? I’m trying this recipe with that butter this week… so far I’ve got a good feeling about it! 🙂
Hi Mary,
Just saw your mouth-watering croissant video – Wow!
I was looking through the comments and wondered if this can be accomplished with gluten-free flour?
From my experience gluten-flour is really soft and requires more water than standard flour.
Can you recommend a good gluten free flour (usually use Bob’s Red Mill or King Arthur) and the water adjustment needed?
Hi Leslie,
I’m sorry, this recipe has not been tested with gluten-free flour. Gluten-free flour does not generally work as a substitute in yeast breads like this. It’s better to go for a recipe that has been developed to be gluten-free from the ground up.
I’m sorry that I cannot help with this.
Stay well and safe,
Mary
Are you supposed to activate the yeast in water during the first step?
Hi Talia,
No, just follow the instructions in the recipe. This isn’t like other bread recipes where you want the yeast to be active right away. That’s way we use cold water so the yeast doesn’t “wake up” too soon in the process. I hope that makes sense 🙂
Cheers,
Mary
Hi there! In the video it says to see the printable recipe regarding what to do if you have extra dough or don’t want to make all 12 at once? I can’t seem to find it or did I just miss it? Is it possible to roll up the croissants and freeze them? Defrosting in the fridge and then proofing just like we do fresh?
Thanks
Kaitlyn
Hello! Thank you so much for your awesome Blogpost! I really love it especially the Video-Tutorial which was a big help during the baking process. I tried to make croissants for three days and baked them yesterday. Unfortunately they didn’t turn out like croissant. They are absolutely not flaky and the inside doesn’t look like croissants. . I was very disappointed from my baking skills. But I probably wanna give it another try and just wanted to ask you for some baking tips.
I think I might know what I’ve done wrong. I used the wrong butter as it was to soft and it started melting when I was working with the dough. And another mistake was maybe that I used active dry yeast which I mixed at the beginning with hot water to activate the yeast. Was that a wrong turn?
Do you have me maybe other useful tips?
Thank you very much in advance 🙂
Iva
Hi Iva,
Don’t give up! <3 It sounds like you already know what went wrong.
The vegan butter has to be solid when being folded into the dough. It's the water in held in the butter that steams up during the baking that separates the layers. If it is melted, this water just gets soaked into the dough and cannot have the same effect. Next time, try keeping it all as cold as possible.This might mean running to the fridge often to let the dough firm up more often. Or waiting for a cooler day.
As for the yeast, you're right again. For this recipe, you must follow the directions to add the yeast to the flour. Next time, If you don't have instant dry active yeast, you can crush the regular/traditional dry active yeast with the back of a spoon (or mortar and pestle or spice grinder) to break down the grains. Instant yeast is just regular dry yeast that is milled finer.
Good luck! <3 I know you can do it!
Cheers,
Mary
That is my question exactly!
I am just on the day 2. And i just started my second lamination. But i started to notice that the butter makes bubbles when i am rolling the dough out ? And sometimes it pops. What did i do wrong ?and is it bad that it pops ?
Hi Nikolina,
That’s totally fine! Not to worry! Keep going and you will have lovely fresh croissants soon 🙂
Cheers,
Mary
Thank you for this recipe! I made these for my daughter’s graduation brunch; she has trouble with digesting dairy and wanted something special. They turned out beautifully and very tasty.
You’re welcome, Caireen! I’m so glad your croissants came out well. Congratulations on your daughter’s graduation! What a special time <3
Cheers,
Mary
Hello, I am French and vegan and I miss the pain au chocolat so much from my childhood. Looking at your recipe, I decided to make them for Christmas. I am still confused what brand of butter you would recommend. Could you please let me know. Thank you!
Hi Margot,
If you can find it them, use Earth Balance Buttery Sticks. They are baking sticks; they perform and taste very similar to dairy butter. If not, Melt also has baking sticks but they tend to melt faster so you have to chill everything more often.
I hope that helps!
Cheers,
Mary
Hi Mary,
Quick question, here in the Netherlands we have several forms of butter, salted and unsalted. What kind do you use?
Rg
Randy
Hi Randy,
The vegan butter I like best, Earth Balance, is like salted butter. Hope that helps!
Cheers,
Mary
Hi Mary,
Thank you for the response! I’ll try it next week and let you know!
Thnx
Randy
Lovely Mary, I’ve made a few of your amazing recipes and this vegan croissant is my absolute favorite so far.
I made em for my bday and everyone loved it. To be honest mine didn’t turn out as in shape as yours but they were incredibly delicious.
I enjoy watching your amazing YT videos and the stunning recipes you make.
Keep up the good work.
Love n kisses from Iran xxxx
Happy Birthday, Saghar! I’m so happy you made this croissant recipe and enjoyed it <3 Shaping just takes practice and as you make more, your croissants will become more and more beautiful. Have a wonderful day <3 I hope you can stay well and safe.
Cheers,
Mary
this recipe is extremely inaccurate. 4 cups of flour is clearly way too much. I just did steps 1 and 2 of this recipe two times for nothing. the dough was dry and crumbly both times. the first time I thought it was maybe because I didn’t have the butter at the right temperature, so next time I made sure to leave the butter out ahead of time and monitored its temperature using a thermometer. the 2nd time was still a fail. I wasted sooooo many ingredients.
Hi Isobel,
I’ve made these exact recipe many times and so have many readers/viewers. I’ve seen the results both in person and when people have tagged me; they look good. Did you remember to fluff your flour before spooning into your measuring cup? Packed flour will give you inaccurate measurements which is a common rookie baking mistake.
I would double-check your measurements and for best results, use a scale. Another way to get around this is to add your flour in slowly so you can see the dough forming and stop a little early.
Next time if you have crumbly dough, you can save it by mixing in more water. Only add a teaspoon or two at a time. If you have a stand mixer, this is easy. If you don’t, it’s a little messy to do but it can still work. Good luck!
Cheers,
Mary
Love this recipe! Putting the butter in the dough for the first turn is always a problem for me. I feel like it doesn’t nicely envelope the butter square 🙁
But I was wondering if I can freeze the dough after the lamination process (if I want to make croissants past 3 days of lamination) and then the day of baking, thaw it and then shape and proof then bake? 🙂
great recipe, just want to ask the last step, after I shaped in triangle and placed in room temp for rising double size, the butter melted in liquid, the dough become wet and very soft, any other suggestion ?
Bake it anyway.
Next time, maybe try to find a place that is a bit cooler to leave the croissants to rise. Sometimes vegan butter will melt more easily than regular dairy butter so you need to find the balance between having it warm enough for the dough to rise but also keep the butter solid.
Good luck, Tine Tine!
Cheers,
Mary
Mary, a few of us are asking how do we save some of the dough to make at a later date?
This recipe makes 12, so how can we save some for later and freeze it?
I imagine we can form the croissants and re-freeze them, and when ready to bake take them out and let them proof. How long will it take a frozen croissant to proof? Then, bake according to recipe right? Many Thanks.
Have you tried Miyoko’s Vegan butter made from Cashews. Let us know if you test this with a gluten-free flour that works. I’m going to try Sorghum.
I did attempt this with GF Oat flour and yeast and Oats do not like each other!!!
Hi Lauren,
At this point, I don’t recommend freezing the dough at all. The vegan butter tends to separate upon thawing which makes a real mess and the layers don’t turn out. The better option is freezing baked croissants after they have cooled. Then they can be thawed at room temperature for 15 minutes or so and optionally re-baked to crisp up (preferably in an air fryer).
I have not used Miyoko’s butter in this recipe. And I have not used gluten-free flour for either. Please let me know how yours turns out! I’m super curious!
Cheers,
Mary
I just made a batch with miyokos butter and they turned out wonderfully 🙂
Hello, this recipe looks yummy! Quick question, if I wanted to bake these first thing in the morning, could I shape them the night before and let them proof in the fridge overnight? And then pull out and bake in the morning?
Hi Carmela,
It’s possible. However it’s possible for them to over-proof overnight. Just a risk so if you have an event that you’re doing this for, best to do a practice run first 🙂 Good luck!
Cheers,
Mary
Oh sorry I see that you are using earth Blanche. I agree this is pretty delicious butter just not very healthy but I will try with that. Thank you so much for making our vegan life fancier
Ah, I see that you saw…after I left my reply just now 🙂 I hope it works out of you. Thanks for the kind words 🙂
– Mary
Thanks for the recipe, I tried this a month ago and the outer layers were thinner than others and when rolling them out to cut, they ripped on top and bottom exposing the butter…. how do we avoid this?
Hi Christen,
The layers should be the same thickness. To help ensure you’re rolling them out evenly, use the techniques should in the video. Especially the one where you use the rolling pin to push straight down on the dough in order to evenly flatten before starting to roll.
Also, use enough flour so that the dough rolls smoothly and doesn’t stick to the table or your rolling pin.
Good luck! I hope that helps!
Cheers,
Mary
These croissants are GREAT!! Thank you, Mary! I’ve just made these for Christmas brunch and I’m so excited to serve them! These taste just like the dairy-based croissants you’d buy at a bakery – I don’t think you’d be able to tell the difference if you did a blind taste test. I’m not -great- when it comes to yeast-risen baked goods but these turned out a treat and I had no trouble with them whatsoever (as Nigella says, “people often confuse ‘difficult’ with ‘time-consuming’“ – too right! These weren’t that tricky to make, it just took three days.)
I used the new “plant-based brick” by Becel (it looks just like a brick of dairy butter, in a gold foil wrapper) and it came out wonderfully. I had the unsalted version on hand, so I added some sea salt to my butter square at the start of the process.
Sending you much love and thanks from Toronto!
That’s so wonderful, Laura! Way to go! Thank you so much for sharing your experience 🙂
Have a Happy New Year!
Cheers,
Mary
I made a batch yesterday and they were delicious! My only problem was that when I took them out of the oven they fell flat when they cooled enough. What should I do to avoid this next time? They didn’t disaggregate compleatly but they were noticeable flatter than when they were hot out of the oven.
Hi Nina,
I’m not sure as I haven’t noticed my croissants falling after cooling. But I imagine that you might have to bake a little longer.
Good luck!
I baked on batch longer but same happened again. They were almost too long in the oven because the ends started to black. Could this have something to do with humidity?
Hi! I was wondering before making these how long the dough and butter should rest. The post says 12-24 hours but it says overnight and I wanted to do a fold 8 hours in. Would that work?
Dear Mary,
I’m from the Netherlands and have tried to make these croissants multiple times, but for some reason they don’t become like your croissants. I use a good flour with instant yeast that still works and Flora vegan butter (79% fat content). I follow your recipe to the letter and everything is fine until the proofing. When I roll the croissants they are ‘ok’, but then when I proof then, nothing happens. They don’t rise or double in size. I have tried like 4 batches with different types of yeast, but apart from perfecting my laminating skills, the croissants still won’t proof right. During my last batch I poked the croissant and it didn’t deflate and they felt like wet dough, very sticky.
I don’t really know what is wrong. It feels like the butter melts and mixes with the dough, creating one sticky mess. Do you know what is wrong and what I could do to improve them?
Hi Tom,
I haven’t worked with that butter; if it’s melting into the dough you need to keep things colder so it doesn’t mix into the dough. It really has to stay distinct to create those layers.
You could try making the dough a bit drier by being a bit more liberal with the flour as you’re laminating.
Another reason could be overworking the dough. If you’re rolling the dough too much, making it too thin and effectively smushing the butter into the dough too much, that could be the issue. Try to spend less time rolling and put the dough back in the fridge immediately between turns.
Hope that helps. Good luck!
Hi Mary! Thank you for posting and for the video. I would like to make these tomorrow and wanted to know if I can make them with whole wheat flour? They look delicious! Can’t wait to try them!
Hi Nicole,
I’m sure that it’s possible. However since whole wheat flour absorbs more water than regular all-purpose, the measurements would need adjusting. And I’m sorry, I don’t have those for you.
Good luck!
Mary
Mary. I think your directions for the first turn has a small mistake. I was confused. The video said roll to 24 inches, but the written instructions says 34 inches.
The first time I made these they came out perfect! I’m trying again today. I hope I can do it again. I made plain ones the first time. I want to try making so chocolate ones today.
Thank you so much for catching that typo, Fiona I really appreciate it 🙂
And have fun making your chocolate croissants! It’s nice to hear you already succeeded at the plain ones; you’ve got this!
Cheers,
Mary
Hi Mary, just wondering if I need to wait until the third day to bake or if I can bake them on day two after the third tour?
Thanks!
Britt
Hi Britt,
You don’t have to wait! Don’t forget to pre-heat your oven, then go for it! Please enjoy!
Cheers,
Mary
Worked great! This was my first time making pastries like this. I bake a lot, but I never thought I would make croissants! Easy recipe and came out nice and flaky. Thank you!
Way to go! I’m so happy you enjoyed the recipe. 🙂
-Mary
Can I use a all purpose gluten free flour substitute/use gluten free flour?
No, sorry! This recipe isn’t designed to work with gluten-free flour.
hi!
i’m in the midst of making this recipe right now (waiting to do the third lamination) and my dough is already puffing up/proofing and i’m unsure how to proceed because i’d planned on baking them tomorrow, but I also don’t want them to overproof and I’m unsure how to tell when they’ll be proofed enough given that they’ve already puffed up some– any tips?
Hi veronica,
See if you can turn the chill up in your fridge to minimize the proofing. Or place the dough in the back of your fridge where it’s colder. Some “puff” is okay; it’s happened to me and my croissants turned out fine. You’ll roll it out during the lamination.
Hope that helps!
Mary
I LOVE croissants! I’m so excited to try these! I haven’t had any since going vegan so this is at the top of my list!
Love this recipe. I’ve made them a few times and have turned out really well each time.
I found that I had to leave more rise time fit the final rise and I had to lower the temp to avoid burning before they were cooked. No doubt due to my sketchy oven.
Thanks for sharing.
Question. Can the dough be frozen at any point to get the hard work done for a quick grab and go?
Happy Tuesday Mary! I hope you are having a wonderful week so far! I wanted to thank you for sharing with us your amazing recipes. I love croissants and I tried before to prepare and bake them but every time I felt like their consistency it wasn’t how I would have loved to. I wasn’t whole foods plant based diet at that point in time and I used dairy butter. Before I watched so many tutorials and nobody showed or explained to my understanding the whole process like you did. I enjoyed every minute of the process and the dough was the perfect consistency and elasticity for a pastry. I am so happy and grateful that I watched your tutorial and finally I learned properly the lamination process. Thank you again for everything you share with us! Have a wonderful day, week and year ahead! 🌺💗
Yay! I’m happy for you, Adina. Thanks for the lovely comment!
-Mary
Hi is it ok to use vegan margarine as it hard to get vegan butter in Australia?
Thanks
It has to be the kind that is firm like real butter. I don’t know how margarine is like in Australia but if it’s anything like the margarine in Canada, it won’t work for making croissants. It will leak out dreadfully when you get to the laminating stage.