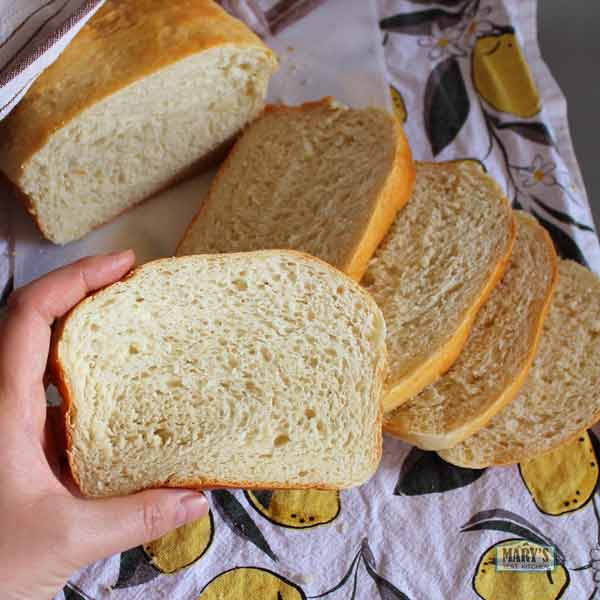
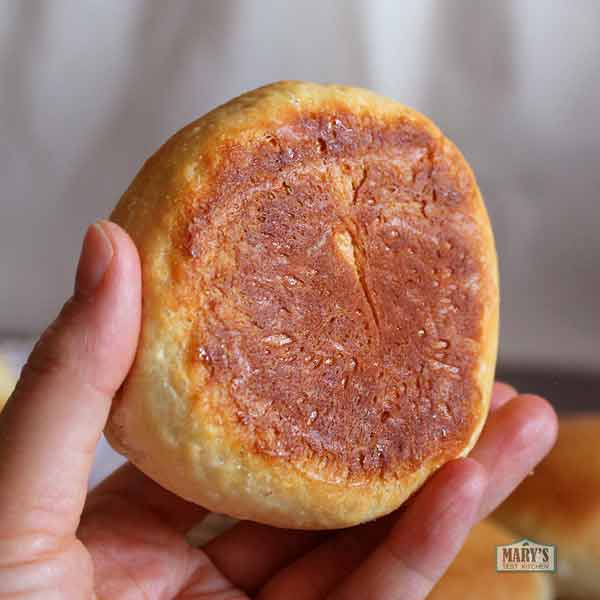
This easy vegan milk bread comes out soft, squishable and oh-so-fluffy! Think of it as an easier version of Chinese Milk Bread or Hokkaido Japanese milk bread. It’s a one-bowl bread recipe using a modified tangzhong technique to ensure a tender texture without adding any eggs or dairy. And because you don’t have to do anything on the stove-top, it’s easier than my original Vegan Milk Bread. The hardest part about this recipe is just waiting! But it will be worth the wait, trust me.
Skip to the Printable Recipe or Pin this for later.
Video tutorial for Easy Vegan Milk Bread
Why make Easy Vegan Milk Bread?
Other than being extra fluffy and delicious, this vegan milk bread also stays fresh longer than other homemade breads. This one-bowl recipe uses a modified tangzhong technique that fully hydrates and cooks a portion of the flour before the rest of the dough ingredients are added. This is responsible for the high level of moisture that stays in the bread and keeps it tasting fresh for days.
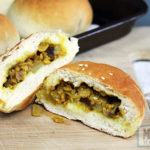
Like many Chinese bakery breads, this easy milk bread is sweet and delicious enough to eat by the slice without anything added. You can also use the dough to make vegan versions of Chinese BBQ Pork Buns (Char Siu Bao), Pineapple Buns or make Korean Six Sided Cream Cheese Garlic Bread.
If you want a soft, squishable sandwich bread that is not so sweet, just reduce the sugar in the recipe. Instead of 1/4 cup for a batch with two loaves (or 16 buns), use only 2 tablespoons.
More Asian Bakery Things:
-
- BBQ “Pork” Buns
-
- Curry Beefless Buns!
About Measurements
Before measuring flour, fluff it up with a fork or whisk. To measure, lightly scoop up the fluffed flour. Do not drag the cup through the flour which will cause it to compact. Do not tap on the measuring cup. Use a flat edge (like the back of a knife) to sweep away the excess flour, leveling it off. OR be even more accurate and measure the flour by weight.
With the above method, one US cup yielded 140 grams or 5 ounces fairly consistently. Because this is an “easy” recipe, I made it based on this volume measurement. If you’re a stickler for detail and/or use my previous recipes, keep in mind that this conversion (1 cup = 140g) only applies to this recipe. In most other recipes, 1 cup = 120g which is the customary conversion.
Most of my readers are in the US while I’m in Canada. Lucky for me, I have both types of measuring cups. If you measure by cups, this recipe will work no matter if you’re using US cups or Canadian (metric) cups. Just stick to one system or another. Or, again, just measure by weight.
If you couldn’t tell by now, I really recommend measuring by weight. I find my kitchen scale endlessly useful; the best $20 I’ve spent on a kitchen gadget. When you’re looking for a good kitchen scale, make sure it can measure to a single gram and has a capacity up to 5kg (11lbs). It should have a tare button so you can measure different ingredients in the same container. And ideally, it should have a button to easily switch from grams to ounces, especially if you tend to cook out of both US and international cookbooks/blogs.
 How to Make Vegan Milk Bread Easily
While my original Vegan Milk Bread Recipe requires cooking up some tangzhong (water + flour) on the stove, this recipe combines a bit of all-purpose flour, cornstarch and just boiled hot water to achieve a similar effect. In a large mixing bowl, combine the flour and cornstarch first. Then when your water has reached a boil, immediately add it to the bowl, and stir to form a sticky paste.
Add the yeast mixture
Use a spatula to gather this paste and push it up to the side of the bowl, leaving enough room at the bottom of the bowl to add warm soy milk (or plant-based milk of choice), a bit of sugar, and 1 envelope of yeast. This way, you can allow the yeast to bloom in the bowl at the right temperature (105-110°F, never hotter) without using a second bowl. The paste mixture will be too hot so don’t mix it into the yeast mixture just yet. Instead, wait 5 to 10 minutes for the yeast to bloom. The yeast mixture will look foamy and you will see some bubbly activity indicating the yeast is alive. The surface of the mixture will slightly dome as the volume increases due to the gas build-up.

If the yeast mixture does not bubble and does not foam up (or just barely), you may have dead or mostly dead yeast. Do not proceed, do not pass go, do not collect $200! Read my post on troubleshooting yeast. You might need to pour out the yeast mixture and start that part again. You can keep your tangzhong though.
After the yeast has bloomed, give the flour paste a temperature test with either your thermometer or a clean wet finger. It should be just a little warm or room temperature. When it is 110°F or cooler, you can mix it into the yeast mixture until totally dissolved. I used my stand mixer’s paddle attachment on starting at a low speed then ramping up to speed 6 for one minute.
Add the rest of the dough ingredients
Next, you can add the sugar. If you want a sweet Asian bakery-type milk bread, add the full amount of sugar: 1/4 cup. Continue to stir until it’s dissolved. Then (if you’re using a stand mixer), switch to your dough hook, add 5 cups (25 oz or 700 grams) of all-purpose flour, 1 teaspoon of salt and let your mixer run for about 6 minutes on speed 2. Every minute or so, pause the machine so you can scrape down the sides as needed. The dough will become well formed, though still quite sticky, without no dry bits. Afterwards, let the dough rest for 10 to 15 minutes.

If you’re working manually, just stir with a spatula or wooden spoon until the dough comes together before working it with your hands. It’s a sticky dough so when it just comes together, let it rest for 10 to 15 minutes. This time will let the flour hydrate more fully and it will become easier to handle. Then, turn the dough out on to a clean work surface and dust with flour so you can knead it until it’s fairly smooth.
Manually kneading sticky dough
Kneading sticky dough like this one requires a little finesse. I find it easiest to knead sticky dough if I oil my hands first. You may need to add a bit of flour here or there but try your best to keep it to a minimum.
Lay your dough out on your lightly floured work surface. We’ll call the edge of the dough closest to you the bottom edge and the edge farthest from you, the top edge. Grab the top edge and pull away from you, stretch the dough gently. Fold this stretched edge over to the bottom.
At this point, you may be tempted to squish down the dough with the heel of your palms like you might if you were kneading a drier dough (such as pizza dough). But refrain from doing so because this will reveal more stickiness in the middle of the dough.
Instead, turn the dough 90° so that the folded edge is now on the right hand side. Then repeat by grabbing the new top edge, pulling it away from you, folding it over and turning once more.
The dough will stick some and you can mitigate this with a little dusting of flour here or there. You may also be tempted to rub your hands together to rub off the sticky dough. Don’t! Just wash your hands, oil them up again, add a light dusting of flour and continue. The dough will become easier to handle as you go.
Put on some music or a good podcast and continue this method of kneading until the dough is fairly smooth; about 15 to 20 minutes.
Incorporate Vegan Butter + First Rise
The final ingredient is room temperature vegan butter. Cut it up into small pieces, then add it to your stand mixer bowl. Run the machine with the dough hook at speed 2 for 5 minutes until the butter is well incorporated. You may have to stop it now and again to scrape down the sides. Since the butter contains more moisture, you may want to add 2 to 4 tablespoons of flour (20 – 40g) during this time if it isn’t coming together.
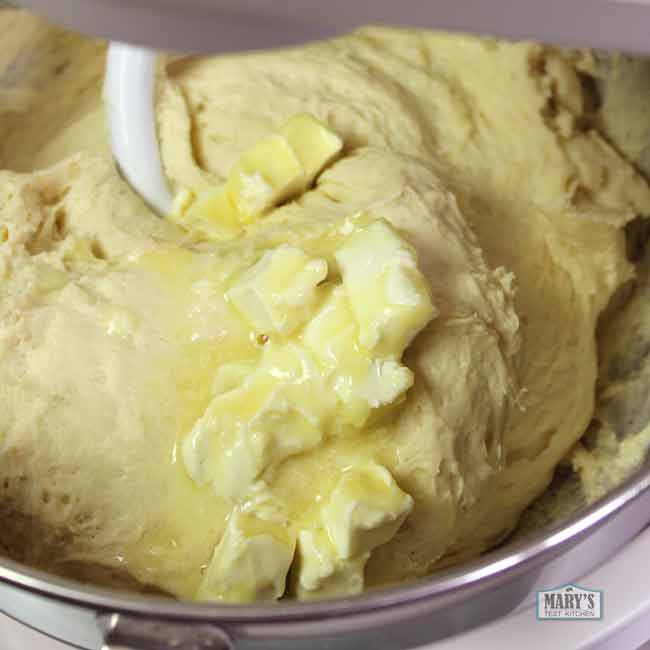
If you’re working manually, knead in the vegan butter by flattening the dough, sprinkling on little pieces of butter and folding the dough over. Continue until the vegan butter is fully incorporated. As before, add flour only if absolutely necessary.
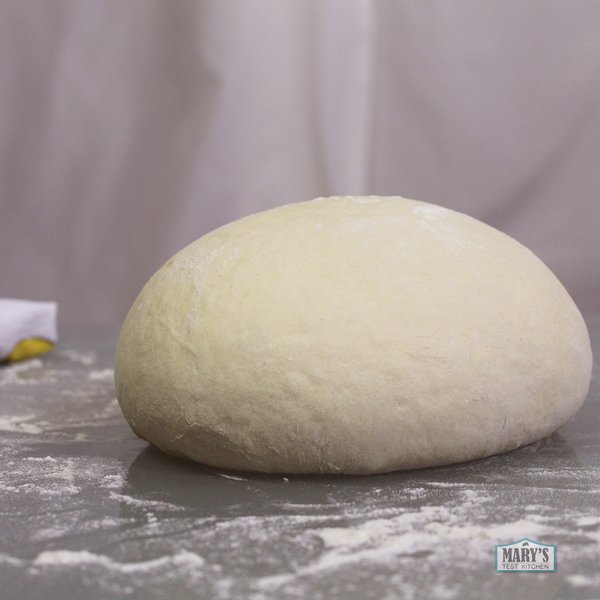
When the vegan butter is fully incorporated, place the bowl with the dough in a warm, draft-free location and cover it with either a clean damp kitchen towel or plastic wrap. Let it rise until doubled or tripled in size. This can take 1 hour to 90 minutes depending on your room temperature. The warmer it is, the faster it will rise. Meanwhile, clean up your work surface.
Shape + Second Rise
Uncover the dough and replace your dough hook. Run your mixer at speed 2 for 2 minutes to knock out the air pockets. If working manually, knead the dough right in the bowl for a few minutes. Finish by shaping into a large ball.
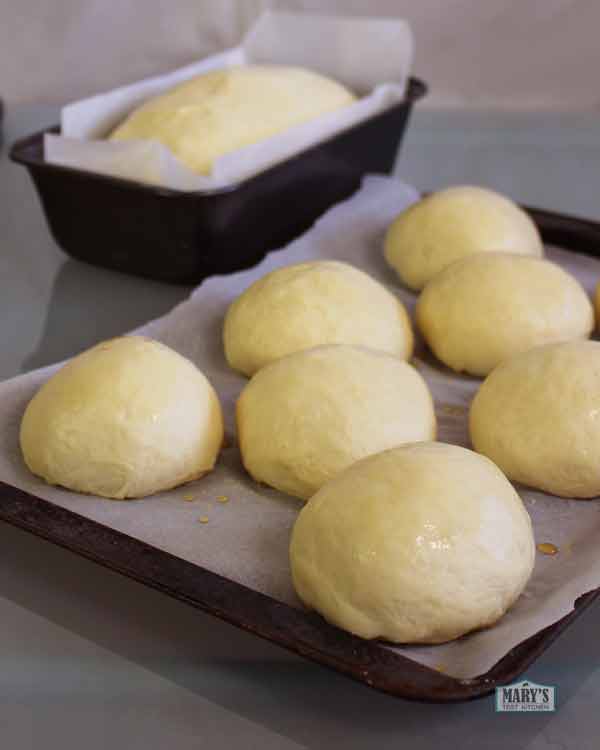
Lightly dust your work surface with flour. If you’re making 2 loaves, line two loaf pans with parchment paper.
To form a rectangle loaf, press the dough flat into circular shape. Make it as wide as your loaf pan. The roll it up as tight as you can and pinch the edges to make it stick together. The roll will be a little longer than your pan now. Using the palms of your hands, wrap the ends under and place into your loaf pan with the pinched side down.
To form buns, divide the dough into 6 to 8 pieces depending on how large you want them. Shape them into nice looking balls by folding over the edges into the middle of one side and pinching. Place them pinched side down on a parchment lined baking sheet with plenty of room between each.
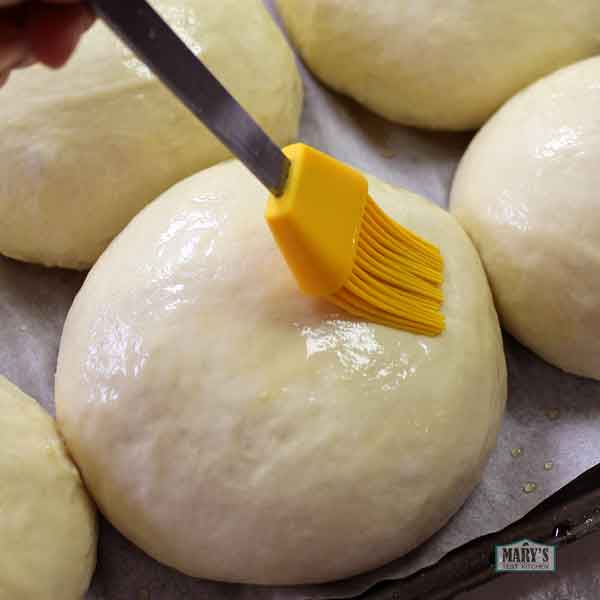
Brush the top of the loaf/buns with oil, then cover as before and let the dough rise in a warm, draft-free location until doubled in size; about 1 hour.
With about 15 minutes to go on your 1 hour timer, start to preheat your oven. Also prepare the syrup wash by combining 2 teaspoons corn syrup with 1 Tablespoon water and stirring until completely dissolved.
Bake the risen dough
When your oven is preheated to 350°F and your loaf or buns have fully risen, uncover your loaf/buns.
Place in the center of the oven on the middle rack and bake for 30 to 40 minutes or until the tops are deep golden brown. Buns require less time while large loaves will require more. Let cool completely before slicing. Enjoy!

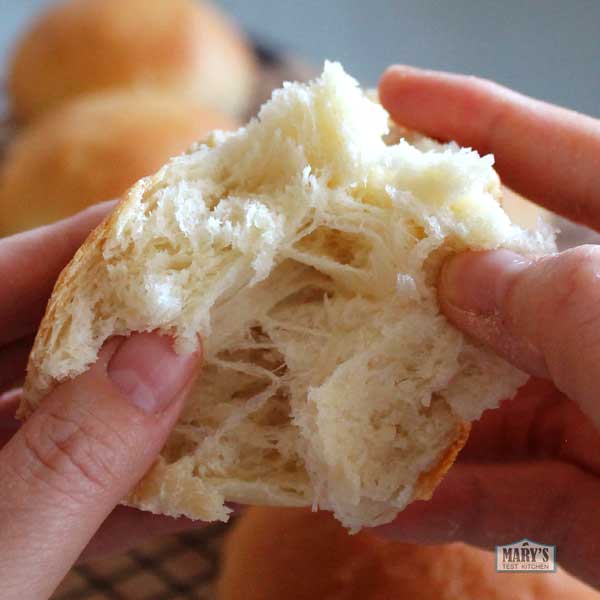
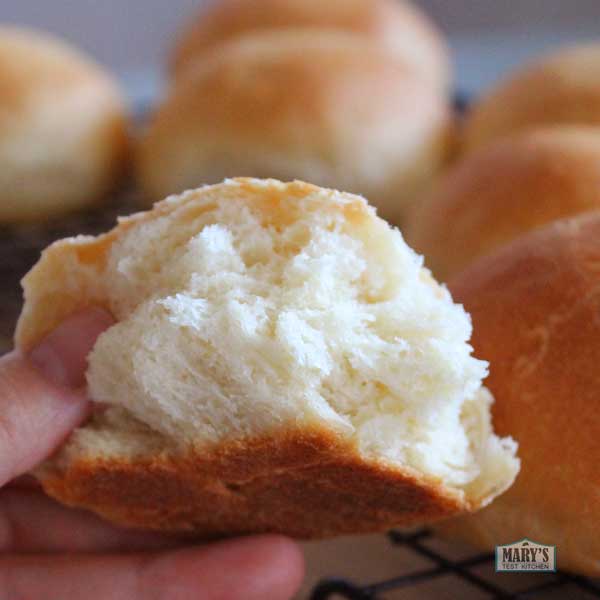
You can double-check that your easy vegan milk bread is baked all the way through but tapping on the bottom of the loaf. It should sound hollow.
Before slicing your bread, let it cool completely. This allows excess moisture to escape so you don’t squish your bread as you’re trying to slice it. And you won’t burn your fingers. Like I did. ‘Cause I’m impatient.
How to Store Easy Vegan Milk Bread
After allowing the bread to cool completely, I keep the bread on the counter with a cover over top. You could also put it in air-tight containers or zip-top bags. The bread will stay moist and fresh for up to 5 days.
For longer-term storage, slice the bread as desired, then place in freezer bags and remove as much air as possible before sealing. Try pushing out as much air as possible, zipping the top most of the way, then inserting a straw to suck up the last of the air before deftly closing it completely. Freeze for up to two months.
To thaw frozen easy vegan milk bread (and most other types of bread), remove just the number of slices or buns you want to thaw. You can bang the loaf on the counter to get the slices to separate. Place the slices or buns in a air tight bag and let thaw on the counter top. Or you can place the slices directly in your toaster to toast. For fast, un-toasted slices or buns, microwave for 10 seconds or less. Cook for just enough time to warm them to the middle but avoid overheating or they will turn chewy and dry.

What will you do with your vegan milk bread? Make loaves? Make buns? What kind of sandwiches will you make? I’d love to know. Please comment down below! If you make this recipe, I would really appreciate if you rated the recipe and let me know how it went. Cheers!
Printable recipe for Easy Vegan Milk Bread
Easy Vegan Milk Bread
This easy vegan milk bread comes out soft, squishable and super fluffy! It's an easier version of Chinese Milk Bread or Hokkaido Japanese milk bread using just one bowl and a modified tangzhong technique to ensure a tender texture without adding any eggs or dairy.
And because you don't have to do anything on the stove-top it's easier than my original Vegan Milk Bread. The hardest part about this recipe is just waiting! But it will be worth the wait, trust me.
Ingredients
Step 1 (flour paste):
- 1/2 cup flour (70g)
- 2 Tablespoons cornstarch or potato starch (16g)
- 1 cup hot water, just off the boil (235ml)
Step 2 (yeast mixture):
- 2 cups warm soy milk, 105-110°F (475ml, 40-43°C)
- 2 1/4 teaspoons dry active yeast (instant or regular)
- 2 teaspoons sugar
Step 3 (remaining ingredients):
- 1/2 cup sugar or less for less sweet bread, SEE NOTES (100g)
- 5 cups all purpose flour (700g) plus more for kneading + shaping
- 2 teaspoons salt
- 1/4 cup vegan butter, room temperature (60g)
Step 4 (syrup wash):
- 1 tablespoon corn syrup (15ml)
- 1 tablespoon water (15ml)
Instructions
Before measuring flour, fluff it up with a fork or whisk. To measure, lightly scoop up the fluffed flour. Do not drag the cup through the flour which will cause it to compact. Do not tap on the measuring cup. Use a flat edge (like the back of a knife) to sweep away the excess flour, leveling it off. OR be even more accurate and measure the flour by weight (step 1, 70g flour; step 3, 700g).
Note that variables such as weather/humidity affect how much flour is required so use the measurements as a guide and feel free to add a bit more. Keep the dough on the soft and sticky side.
Step 1 - Make the Flour Paste:
In a large mixing bowl, combine 1/2 cup flour and 2 Tbsp cornstarch and mix well. Taking care not to splash, add 1 cup of hot boiling water and stir vigorously until a smooth paste forms. Use a wet spatula to scrape the sticky mixture into a single clump and push it up on to one side of the bowl, high enough to clear two cups of liquid.
Step 2 - Bloom the Yeast:
To the large mixing bow, add 2 cups warm soy milk (105°-110°F), 1 envelope or 2 1/4 tsp of yeast plus 2 tsp of sugar and stir well. Let the mixture rest until foamy (about 5 to 10 minutes).
If it does not foam, you may wait longer. If it still does not foam, the yeast is dead and you should re-do this step with new yeast. SEE MY GUIDE TO TROUBLESHOOTING YEAST AND DOUGH.
Mix the flour paste into the yeast mixture until dissolved.
Step 3a - Make the Dough:
Add 1/2 cup sugar (or adjust amount as desired) and stir until dissolved. Add 5 cups flour and 2 tsp salt and stir until the dough starts to form.
For stand mixers: switch to your dough hook and run at speed 2 for 4 minutes. Scrape down the sides occasionally.
The dough should be well combined, with no dry bits and still sticky. Cover, and let rest for 10 minutes.
For working manually: Rest the dough for 10 minutes before starting to knead.
Oil or flour your hands well to prevent sticking. Transfer the dough to a clean work surface, dust well with flour and knead until the dough is fairly smooth; about 15 to 20 minutes. CLICK HERE FOR HOW TO KNEAD STICKY DOUGH.
Step 3b - Incorporate vegan butter + First Rise
Cut the vegan butter into little pieces and add to your stand mixer's bowl. Run at speed 2 for 5 minutes until the butter is well incorporated. If the dough has not come off the sides into a cohesive ball, feel free to add 2 to 4 tablespoons of flour and run a little longer. The dough should be smooth but still tacky at this point. Remove your dough hook and cover the bowl with a clean damp kitchen towel or plastic wrap
If you're working manually, knead in the vegan butter by flattening the dough, sprinkling on little pieces of butter and folding the dough over. Continue until the vegan butter is fully incorporated. You may add 2 - 4 tablespoons of flour during this time to help the process along. Place the dough back in the mixing bowl and cover with a clean damp kitchen towel or plastic wrap.
Place in a warm, draft-free location and let the dough rise until doubled or tripled in size; about 1 hour. Meanwhile, clean your work surface.
Step 4 - Shape and Second Rise
Uncover the dough and replace your dough hook. Run at speed 2 for 2 minutes to knock out the air pockets. If working manually, knead the dough right in the bowl for a few minutes. Finish by kneading it into a dough ball.
Lightly dust your work surface with flour. Line your loaf pans or baking sheets with parchment paper.
To form a sandwich loaves, divide the dough in half. Press the dough flat into rectangular shape. Make it as wide as your loaf pan. The roll it up as tight as you can and pinch the edges to make it stick together. The roll will be a little longer than your pan now. Using the palms of your hands, wrap the ends under and place into your loaf pan with the pinched side down. Repeat for a second loaf or divide further to make buns.
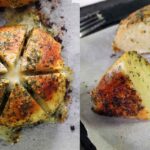
To form buns, divide the dough 18 for small buns, 12 for large dinner rolls,, or 6 for giant buns (like the ones I used to make Korean Six Sided Garlic Bread).
Shape them into nice looking balls by kneading over the edges into the middle of one side and pinching to keep the top tension. Place them pinched side down on a parchment lined baking sheet with plenty of room between each.
Make the syrup wash by combining 1 tablespoon corn syrup and 1 tablespoon water. Brush the top of the loaves/buns,then cover as before and let the dough rise in a warm, draft-free location until doubled in size; about 1 hour.
With about 15 minutes to go on your 1 hour timer, start to preheat your oven.
Step 5 - Bake
When your oven is preheated to 350°F and your loaf or buns have fully risen, uncover your loaf/buns and brush the top(s) with your prepared syrup wash.
Place in the center of the oven on the middle rack and bake.
For two loaves, bake for 35 to 40 minutes or until tops are golden brown and the bottoms sound hollow when you tap them.
For buns, bake for 25 - 35 minutes; shorter time for smaller buns, longer time for larger buns. Remove from the oven when they are nicely browned on top and bottoms (but not burnt!)
SLICING + STORAGE
Let the bread cool completely to room temperature before slicing.
After the bread is completely cooled, it can be stored in an air-tight container at room temperature for up to 5 days. Remove air from the bag and freeze for longer storage; up to 2 months.
To thaw frozen bread, keep in a bag and let it thaw a room temperature. For speedier results, microwave buns for 10 seconds or less just until thawed in the center.
Notes
*Sugar (in step 3)
- 1/2 cup of sugar makes a sweet Chinese bakery-style bread
- 1/4 cup of sugar is suitable for less sweet but still noticeable sweetness
- Use 2 Tablespoons of sugar for regular white sandwich bread
Flour
This recipe uses all-purpose flour. Bread flour can also be used. Gluten-free flour blends will not work.
You will need 5 1/2 cups (770g) of flour for this recipe. You may also need an additional 2 - 4 tablespoons (20-40g) of flour after incorporating the vegan butter. This amount may vary since different vegan butters have different levels of hydration. Also, weather/humidity can affect how much flour you'll require.
Feel free to use extra flour to use as a barrier while shaping your buns/loaves. Try not to incorporate it into the dough; just use it to prevent sticking and brush off any excess before adding the syrup wash or baking.
Nutrition Information:
Yield:
16Serving Size:
1Amount Per Serving: Calories: 105Total Fat: 4gSaturated Fat: 2gTrans Fat: 0gUnsaturated Fat: 1gCholesterol: 9mgSodium: 313mgCarbohydrates: 16gFiber: 1gSugar: 9gProtein: 2g
Nutritional Information automatically calculated by a plugin and may not be correct.
-
[…] white rolls to have this garlic bread ready in about 20 minutes. Or you can make your own vegan milk bread buns; up to you! Also your choice, bake in either a regular oven or an air […]
[…] Easy Vegan Milk Bread […]
Leave a Comment
Hi Mary! I totally forgot to do the syrup wash before the second rise, so I did it right before putting them into the oven. Will this make too much of a difference? They’re currently baking and I’m so excited!
Hi Madhvi,
Sorry this reply is so late. I’m guessing by now you know it is totally fine to add the syrup wash just before baking. I only put it on earlier so the buns wouldn’t stick to the plastic wrap / form a skin on top. Sometimes if a skin forms on top of the rising buns, they become uneven or they may burst in the oven.
Cheers,
Mary
I know you said gluten free blends would not work, but would a 1:1 four blend work if it’s gluten free.
Sadly we’re allergic To gluten. 🙁
Still no, sorry. Those are great for things like muffins and cakes but not yeasted things.
Dumb question maybe, but any reason not to let the stand mixer do the kneading?
No, you can let your stand mixer do all the work like I did in the video 🙂
Does it have to be soy milk? Can I sub another type of milk, like oat milk?
Hi Peggy,
I’m sure that would be fine.
Cheers,
Mary
Great recipe! What can I use instead of corn syrup? Here in Australia it’s hard to find. Thanks 🙂
Thanks for the question, Maria! I think you have something called golden syrup? I also like maple syrup. But I suppose any syrup can do in a pinch 🙂 Good luck! I hope that helps.
-Mary
Hi Mary!
I made this yesterday and absolutely loved it. My family ate it all, lol. Would whole wheat flour work with this? Out of regular flour and desperate times call for desperate measures?!
Thank you!!
Hi Vi,
I’m so happy to hear that you loved this recipe! Yay! <3 Nicely done!
But sorry, whole wheat flour would really weigh this bread down. Generally, you can sub up to 1/3 of the flour with whole wheat. But the texture will still be heavier with that.
Whole wheat absorbs more water, plus the bran in the flour cuts the gluten strands preventing them from developing the way we want. When I'm making whole wheat bread, sometimes I'll sift out the bran and only add it back in at the very end after the gluten in the dough is well developed.
So with these things in mind, if you really want/need to make it with whole wheat…adjust your expectations. Otherwise, as I always say, this is your vegan milk bread and there are no rules 😉
I hope that helps and isn't too confusing.
Cheers,
Mary
Thank you, Mary!!
I know another person asked about a 1:1 flour blend, but would I be able to use the gluten free all purpose flour from Bob’s Red Mill and add xanthan gum?
No. I’m so sorry but it just doesn’t work even if you add a xanthan gum.
I feel like every time I try to make something like this, I panic at how sticky it is and add too much flour! I made buns and theyre definitely lovely, but not as soft or fluffy as I know they ought to be. Next time I’ll trust the method and go with the wet dough. Thank you for this easy recipe, it was a breeze!
Hi Amanda,
Yes, it’s a sticky wet dough…and that really makes a difference! I’m so glad you still got some tasty buns out of your experience. And hopefully build some confidence for next time 🙂 You can do it!
Cheers,
Mary
I was terrified by how wet my dough was, and even after adding 1/4 of flour after incorporating the butter it still didn’t come into a ball. Where I live it’s very humid so I figure it had something to do with that. I didn’t want to add more flour and compromise the ratios so I just went with it. It was a little messy and sticky shaping my rolls, but they turned out amazing in the end. I did one loaf and eight rolls. I have only a 24inch oven so it definitely would not have fit all together. I shaped my loaf and put it in the fridge while I shaped my rolls and for the first half of their rise. Then I took out the loaf for it’s second rise while my rolls were finishing theirs and during their time in the oven. By the time the rolls were out, the loaf had risen and was ready to go in. Glad I got my timing right on that one! Thanks for the recipe, Mary!
Way to go, Consuelo! Yes, that dough is quite wet but that’s part of what makes it so wonderful after it bakes. I’m so happy it worked for you. Thanks so much for sharing your experience here <3
Stay well and safe!
Cheers,
Mary
I can’t wait to make this!! Thanks so much for providing a vegan version of soft and sweet Asian milk breads for the world ❣️
One question, what if I omit the butter? Would it affect the softness/springiness of milk bread? I usually bake yeasted rolls without butter or oil (I use soy milk and that contains a little fat) and they turn out fine and yummy. But I want to make bread really soft and springy like yours here without having to add butter. Is it possible?
Hi Jenn,
The vegan butter does affect the texture and, even more, the flavour. There is a noticeable difference so I highly recommend keeping the butter in. But even without the vegan butter, the bread will be delicious.
Hope that helps! Enjoy!
Mary
Thanks Mary! I made the loaves today and they came out GREAT!!! So springy and soft!! Keeping the dough super moist was a really good idea. Thanks again!
These didn’t turn out great. I brushed the buns with the syrup/water mix to keep the plastic from sticking. When the rise was over I gently pulled the plastic off and it stuck terribly. They lost the smooth top and when baked completely flattened. Any ideas for next time?
Hi Vanessa,
Aw that sucks! It never sticks when I use the syrup wash first but if yours does, I would lift the edge of the plastic slowly and brush a little water in between to help it separate so the plastic doesn’t pull the top of the dough and release all the gas.
If it does flatten, you can re-shape the buns and let them rise again, rather than just bake the flattened dough.
While I don’t know why your plastic stuck, next time, you can avoid that entirely by covering instead with a damp lint free kitchen towel. Make sure the towel never dries out (that makes it stick). And only add the syrup wash after they have risen.
One other method is to dust the tops of the buns generously with flour, then cover with plastic wrap. The flour then acts as the barrier between the plastic and dough. Afterwards, you would need to brush off all the excess flour before adding the syrup wash.
Hope that helps! Good luck!
Mary
My daughter and I plan to make this, however we are out of soy milk. I would like to know if I can switch the soy milk with hemp milk.
Thank you!
yes absolutely, any plant-based milk that you enjoy will work. Have fun!
Cheers!
Mary
Yay! Thank you so much for your quick response. We will try it today with hemp milk.
Hi Mary! I just made two little loaves and a couple buns, but I don’t know where I went wrong. Parts of the inside weren’t cooked enough even when I left them in the oven for 45+ minutes. They didn’t have that soft, fluffy texture. I made this by hand (and it’s my first time making bread….) Any tips? 🙁
Hi Emily,
aww that is so frustating! But I think I can help. It sounds like your oven wasn’t hot enough. Did you remember to preheat your oven? On some ovens there’s an indicator light that goes on when you turn the oven on but turns off after the oven reaches your set temperature. On some other ovens, it will beep when it reaches the right temperature.
If you did totally preheat the oven, it might be inaccurate. Many ovens are off by a little (sometimes a lot!). I highly recommend getting an inexpensive oven thermometer to confirm (I got mine at a local grocery store for about $10).
If purchasing is not an option, next time, just bump up the temperature by 25°F and see where that gets you. Over time, you’ll figure out how much lower your oven is running (if that indeed is the issue).
Good luck! Don’t give up! Please let me know if you have any other questions.
Stay safe and well,
Mary
Hi Mary
Is the kneading necessary. Found other sites which do no-knead bread and come out nice as yours. It saves time if nothing else.
Thanks. God bless
I’ve tried making this recipe a few times but it never fits perfectly In my Pullman pan. What is the Baker’s ratio for this??
can we use coconut oil instead of vegan butter?
Hi Tanja,
The vegan butter does affect the texture and, even more, the flavour. There is a noticeable difference so I highly recommend trying to get vegan butter. But even without the vegan butter, the bread will be delicious. Especially if you find butter-flavoured coconut oil.
Hope that helps! Enjoy!
-Mary
Hi Mary,
My wife and I have been vegan for a couple months now. At the beginning it was all store bought items for a couple weeks, then I turned myself into an absolute PRO at cooked meals. Now I’ve been attempting baked goods also, and I stumbled upon your bread recipe. My wife is Brazilian and her grandma always made a sweet milk bread, and lately she has been craving it, so I gave your recipe a try. I don’t currently have a bread pan so i used a brownie pan. And I only cut the dough into two larger loaves. Also, I used Avocado oil instead of canola oil. All in all, it came out like absolute heaven in my opinion, and I can’t wait til my wife wakes up and tries it! Thank you so much!!! =)
We’re stopped buying bread and now I just make the buns every few days! They’re sooo good! We do the less sugar for every day use. Thank you for sharing this! Also, wow, it really makes a different to weigh the flour.
Yay! I’m so happy for you, Victoria! Thanks for the kind review <3 And yes, weighing flour is so important for baking 🙂
Cheers,
Mary
Hi, is it possible to make it with a machine breadmaker?
Thanks a lot for all your amazing recipes by the way, i’m a huge fan of your work! 😊
Hi Alexandra,
Thanks so much for your kind words. I don’t have a bread machine so I couldn’t say for sure but I don’t see why not. Please let me know if it works for you.
Cheers,
Mary
Wow, this makes a LOT of bread! I used the majority of it to make pineapple buns, using the topping recipe from astepfullofyou.com, and then used a few balls to make a small loaf. It’s definitely a treat for the kids, but the recipe was really great! Thank you!
hi! I’m new to cooking/baking and -maybe it’s a dumb question- but, which size of pan do I need to make the loaf?
I can’t wait to make this recipe, I’ve been watching a lot of Japanese bakery videos and can’t wait to try the milk bread and make some sandwich buns 🥰
Any regular “loaf” pan will do. I like this non-stick one: https://amzn.to/3G6QaY2